
Treadmill maintenance is mostly a handful of small, boring habits: wipe, look, listen, check the belt, repeat. Skip them and a good machine starts to hum, wander and smell warm within a couple of years. Keep them and the same machine can run quietly for a long time. Nothing here requires special skill. It requires a calendar, a screwdriver and the willingness to unplug the thing first.
Most owners meet maintenance the hard way. The belt drifts toward the left rail one morning. A faint rubbery smell shows up during a long walk. A squeak appears that wasn’t there in March. Each of those is a message, and most of them were readable weeks earlier.
This guide gives you the whole routine in one place. You’ll get a realistic schedule, a plain explanation of cleaning, lubrication and belt alignment, an inspection checklist, a symptom decoder and the point where a home fix should stop. Our job is to make treadmill maintenance feel like part of the routine instead of a chore you discover after something breaks.
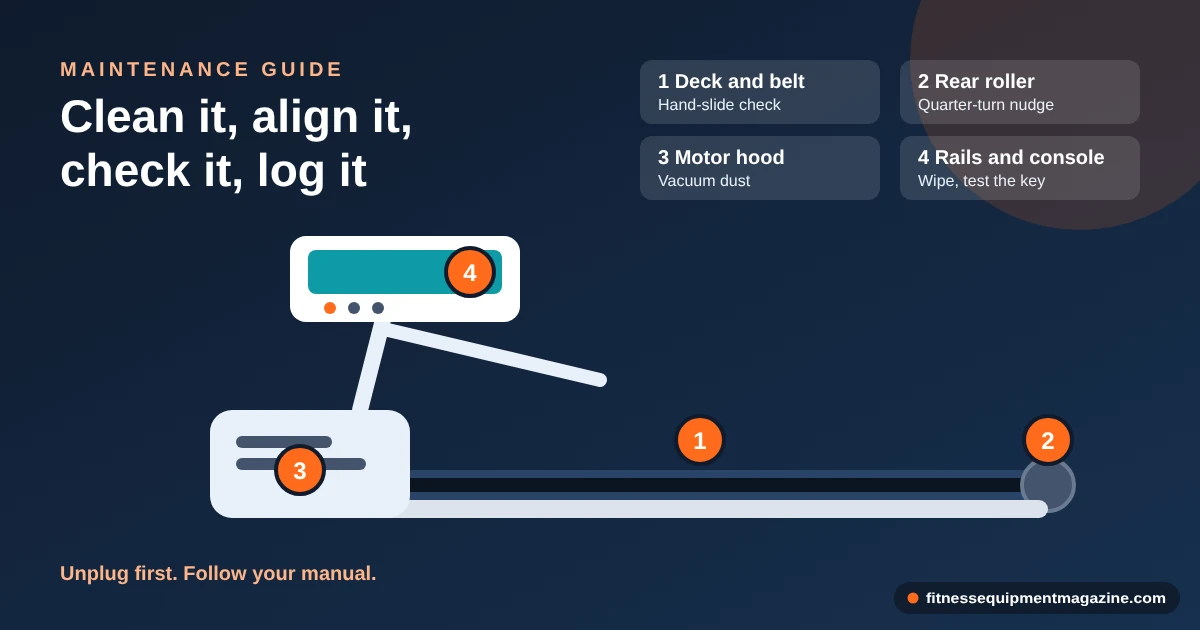
Good treadmill maintenance comes down to four jobs on a rhythm. Wipe the machine and vacuum around it often. Check belt lubrication and alignment on the schedule in your own manual, commonly every few months or after a set number of hours. Inspect bolts, rollers, cords and the safety key every month or so. And always unplug the machine before you reach under a cover.
- Who it fits: anyone who owns a motorized treadmill or a walking pad, from daily walkers to weekend runners. Folding and under-desk models need the same care in a slightly different form.
- The biggest tradeoff: manuals disagree. Some belts want regular lubricant and some are sealed or self-lubricating, so your manual beats any general guide, including this one.
- The common trap: doing the wrong treadmill maintenance confidently, such as spraying a household lubricant under the belt or overtightening an adjustment bolt to cure drift.
If a belt is already slipping or stopping, jump to our belt slipping troubleshooting guide before you go further.
How we researched this. This is research-based guidance built from manufacturer specification patterns, federal safety guidance and ownership problems that buyers commonly report. We haven’t hands-tested or serviced the machines described here, so you won’t find lab numbers or “our technicians” claims. We name no brands and quote no prices. Intervals and measurements below are typical ranges, so verify every one against your own owner’s manual. Last reviewed: October 2026.
Specs, warranty terms, lubricant recommendations and recalls change. Treat the intervals here as typical patterns, not instructions. Before you buy a lubricant, a part or a whole new machine, read the current manual and warranty page. Then check the CPSC exercise equipment recall list for your model, because a recall repair is free and a home fix may not be wise.
What Treadmill Maintenance Really Covers
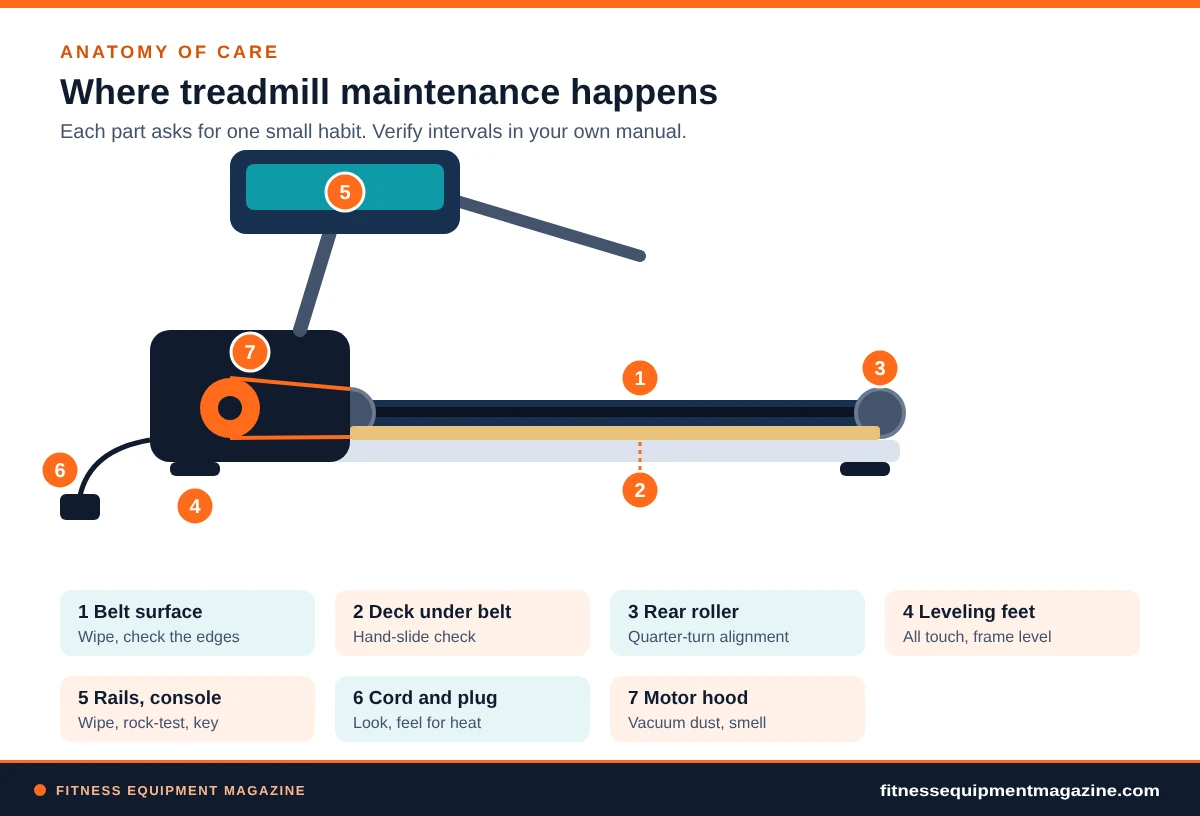
A treadmill looks like one object, yet it behaves like four systems sharing a frame. There’s a moving surface (belt and deck), a drive train (motor, drive belt and rollers), an electronics layer (controller, console, sensors and cord) and a structure (frame, rails, fasteners and feet). Each one fails in its own way. Treadmill maintenance is simply the habit of asking each system one small question on a regular basis.
The four systems behind treadmill maintenance
The belt and deck ask: is it clean, lubricated if the maker says so, and running straight? The drive train asks: is it quiet, cool and free of dust? The electronics ask: is the cord undamaged, the plug snug and the safety key working? And the structure asks: is everything tight and level? That is the entire discipline. Everything else in this guide is detail.
- Surface: wipe the belt edges, vacuum the deck sides and watch for shiny, glazed or frayed spots.
- Drive: listen for new sounds, smell for hot rubber and keep dust out of the motor area.
- Electronics: look at the cord, test the safety key and notice any flicker or reset.
- Structure: tighten loose bolts, check rail wobble and confirm all feet touch the floor.
Why treadmill maintenance pays for itself
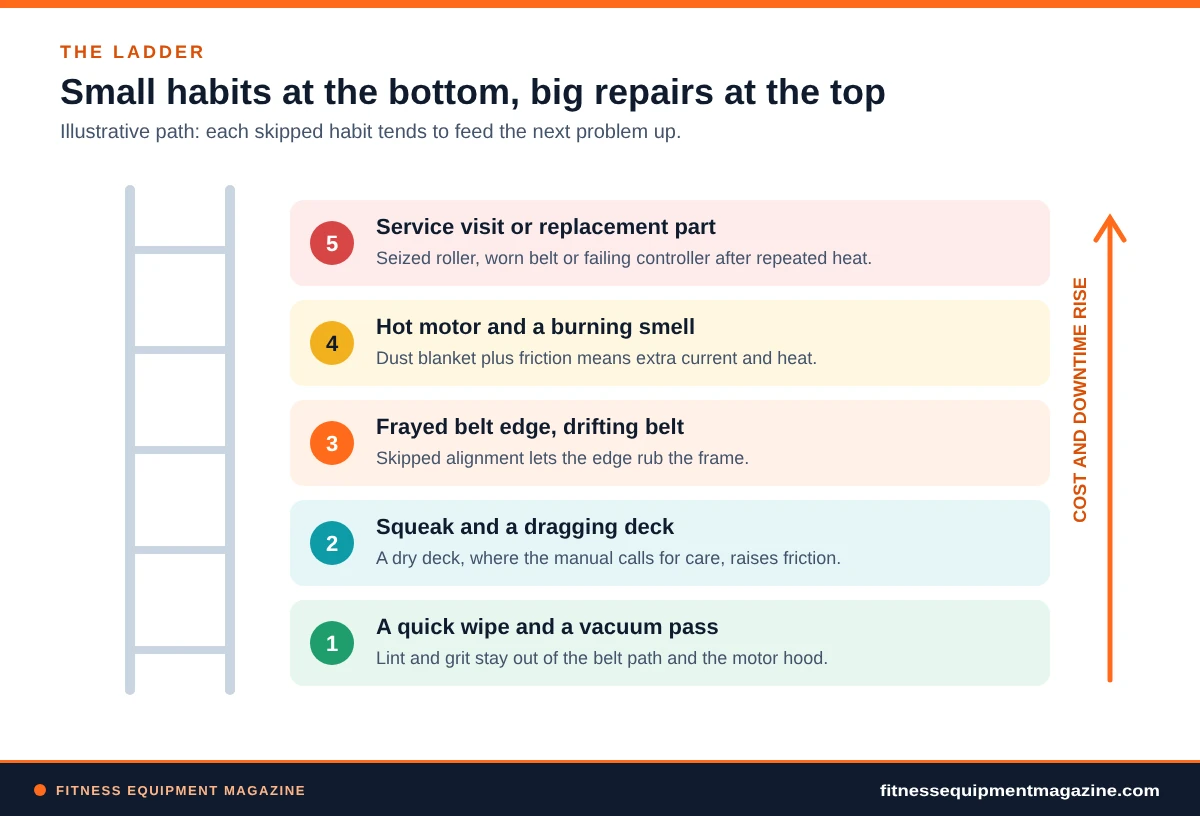
Friction is the quiet enemy. A dry deck forces the motor to pull harder, which means more heat and more current. Dust packed around the motor traps that heat. A belt that drifts sideways frays its edge against the frame. None of these problems announces itself loudly at first, and all of them get more expensive each month you ignore them.
Treadmill maintenance also protects your warranty. Many warranties ask owners to follow the treadmill maintenance steps in the manual, and a claim for a worn deck or burned motor can get tricky if the log shows nothing for two years. Keeping a short note of dates is cheap insurance. We’ll come back to that in the schedule.
What treadmill maintenance is not
Treadmill maintenance isn’t repair. Replacing a motor controller, opening a motor housing or re-tensioning a drive belt inside the hood is work for the manufacturer’s service network or a qualified technician, and it’s fine to say so. It also isn’t a replacement for choosing the right machine at the start. If you’re still shopping, our treadmill buying guide explains which build features make long-term care easier.
Find your manual today. If you’ve lost the paper copy, search the manufacturer’s support page with your exact model number. Print or save the treadmill maintenance page. Everything in the rest of this article assumes you’ll check it against that page.
A Treadmill Maintenance Schedule You Will Keep
A treadmill maintenance plan that asks for an hour a week gets abandoned by March. The one below is designed to be almost invisible: a few seconds after each session, a few minutes every month and a longer look twice a year. Treat the intervals as starting points, since a machine used by four people every day ages faster than one a single person uses on weekends.
The rhythm: after each use, monthly, quarterly, yearly
After each use, wipe the handrails and console, and wipe the belt edges if sweat or spills landed there. Once a week, vacuum around the base and under the front of the machine. Monthly, run the ten-minute inspection later in this guide. Every few months, or at the interval your manual gives, check lubrication and alignment. Once a year, unplug the machine and clean beneath the motor hood if your manual permits you to lift it.
Scale your treadmill maintenance to how you use it
Many manuals express service intervals in hours or miles rather than months, because belts wear with distance. A common pattern is a lubrication check after a set stretch of hours of use, with some belts wanting attention around a few months in a busy home. If your console shows a running odometer or hour counter, write the number on a sticky note inside the cabinet door and compare it every quarter. If it doesn’t, count months.
A household of one walker doing 30 minutes a day sits at the light end. A family of four sharing a machine, or a runner logging several hours a week, belongs at the heavy end. Heavy use doesn’t add extra treadmill maintenance tasks, only that you repeat the same ones sooner. For the wider idea of how motor load and duty ratings relate to wear, see our treadmill motor guide.
Keep a three-line treadmill maintenance log
A log sounds fussy, but it takes thirty seconds. Use a notes app, a sticky note or a pencil on the side wall. Write the date, what you did (cleaned, lubricated, aligned, tightened) and anything odd (new squeak, shifted belt). Three lines is enough. When a service technician or warranty agent asks “when did you last lubricate it?”, you’ll have an answer, and so will your future self.
Put the first Saturday of the month on your phone calendar as “treadmill ten minutes.” Pair it with something you already do, like vacuuming. Habits stick when they ride on other habits.
Safety First, Plus a Small Treadmill Maintenance Toolkit
Before any hands-on treadmill maintenance, power down properly. Turn the machine off at its switch, unplug it from the wall and let it sit for a minute or two. Console boards and motor controllers can hold a charge briefly, and a belt that moves unexpectedly while your fingers are near a roller is how small jobs become emergency room visits. Unplugging takes four seconds. There is no version of this routine where skipping it is clever.
Never reach under the belt, loosen roller bolts or lift the motor hood with the machine plugged in. Keep children and pets out of the room while you work. If a manual tells you to leave the unit powered for a specific adjustment, such as running the belt at low speed to judge tracking, keep your hands, hair and loose clothing well away from the rollers and rear of the deck, and keep the safety key clipped to you.
The toolkit that covers 90 percent of home care
You don’t need a workshop for treadmill maintenance. Most owners can handle everything in this guide with a short list, and the manufacturer often supplies the hex keys in a bag taped inside the original packaging. If yours is long gone, a standard metric set will usually do, but check the bolt head before you buy.
- The exact hex key or wrench the manual specifies for belt adjustment bolts. Using a near-fit tool rounds the head.
- Soft, lint-free cloths and a spray bottle with water and a drop of mild soap, for the frame, rails and console.
- A vacuum with a crevice tool to reach along the deck edges and under the front housing.
- The lubricant your manual names, usually a silicone-based product made for treadmill belts, if your belt calls for any.
- A flashlight and a small level for looking under the belt and checking that the frame sits true.
- A notebook or phone note for the three-line log.
Leave the all-purpose degreaser, the penetrating oil and the cooking spray in the cupboard. We’ll explain why in the lubrication section, but the short version is that the wrong slippery product can ruin a belt’s backing or make a belt slip rather than glide.
Cleaning the Belt, Deck and Motor Area
Cleaning is the least glamorous half of treadmill maintenance, and the one with the best return. Dust and fibers are abrasive, and they travel. Carpet lint, pet hair, sock fuzz and fine dirt from shoes all get pulled under the belt, where they mix with lubricant and form a gritty paste that wears both belt and deck. They also work their way into the motor compartment, where they trap heat.
The belt and deck
Wipe the running surface with a barely damp cloth, never a soaked one. Water that seeps under the belt can wash lubricant out or soften the deck’s wax. With the machine unplugged, you can roll the belt by hand a little at a time to wipe the entire visible surface. Pay particular attention to the edges, where the belt meets the deck, because grit gathers there.
Good treadmill maintenance skips harsh solvents. Plain water with a hint of mild dish soap is typically safe, but manuals vary. If yours names a cleaner, use that. Dry the belt afterwards, since lingering moisture invites a slippery patch the next time someone steps on.
Rails, console and frame
Sweat is mildly corrosive and tends to creep into console seams and under rubber grips. Wipe handrails and the console after sessions with a slightly damp cloth, then dry. Avoid spraying cleaner directly onto the console; spray the cloth instead. Liquid in a control panel is the cause of a lot of mysterious flickering screens.
If you place a towel over the console while you exercise, make sure it isn’t blocking any ventilation openings or hanging into the belt. It’s a small thing, but towels are a surprisingly regular cause of jammed rollers.
Vacuuming around the motor hood
Once or twice a year, treadmill maintenance should include a look at the motor compartment. Unplug the machine and, if your manual says homeowners may remove the hood, take off the cover screws, lift the hood and vacuum loose dust from around the motor, the controller board and the drive belt area. Use a soft brush attachment, not compressed air at close range, because air can push dust deeper or damage components.
Never touch the controller board components with a damp cloth. If you see burned-looking marks, melted insulation or a sharp electrical smell, stop. Put the machine out of service and read the “when to stop” section below. A household with pets or heavy carpet should do this check twice a year instead of once.
Hair is the real enemy. If the treadmill sits on carpet, a mat helps keep fibers from being pulled in by the belt’s airflow. Our treadmill mat guide explains thickness, size and cleaning so the mat helps instead of becoming another dust trap.
Belt Lubrication: Check, Don’t Guess
Here’s the part of treadmill maintenance where owners most often go wrong. Lubrication exists to reduce friction between the underside of the belt and the deck. When it’s right, the belt glides, the motor works lightly and both surfaces last. When it’s missing, the motor strains, the belt drags and the deck wears. When it’s wrong, the belt can slip or the backing can degrade.
Does your treadmill maintenance plan include lubrication?
Not every one does. Manufacturers split into camps. Some belts are designed to be lubricated at intervals, typically with a silicone-based product applied under the belt. Some decks come pre-waxed and ask for periodic checking only. And a number of models, particularly some budget walking pads, use belt and deck combinations that the manual says should not be lubricated by the owner. Only your manual can tell you which camp you’re in.
Look for words like “lubricate,” “silicone,” “waxed,” “maintenance-free” or “do not lubricate” in the care section. If the manual is unclear, contact the manufacturer’s support line with your model and serial number, and write down the answer in your log. Guessing here is the single most avoidable mistake in the whole subject.
The hand-slide check
Even when the manual wants periodic lubrication, you don’t have to apply it on a calendar date. You can check. With the machine unplugged, lift the side of the belt a few inches near the middle of the deck and slide your flat hand between the belt and the deck, as far as you can comfortably reach. Feel the deck surface.
A slick, faintly waxy feel means the deck is happy. A dry, chalky or grabby feel suggests it’s time. A dark, gummy or gritty feel means old lubricant has mixed with dirt, and the right move is cleaning first, not stacking fresh product on top. Pairing the hand-slide test with an honest look at your usage tells you far more than a date on the calendar.
How lubrication fits into treadmill maintenance
When a manual calls for it, the procedure usually follows a pattern. Treat the steps below as an overview of what to expect and let the manual set the details, including how much product and how often.
- Unplug and loosen nothing yet.Disconnect power and gather the exact lubricant your manual names. Many makers sell their own, usually a silicone-based type.
- Clean the visible deck edges.Wipe the area you can reach beside the belt so you’re not pushing dirt under it.
- Lift the belt and apply the specified amount.Spread the product in the pattern the manual shows, often a zig-zag or a pair of lines along each side, working from the middle toward the edges.
- Spread it by running the belt.Reconnect power, stand on the side rails and run the belt slowly for a few minutes, as the manual advises, so the product distributes evenly.
- Wipe overflow and log it.Dry any residue on the frame and write the date and hour counter in your log.
If your treadmill has a built-in lubrication reminder, the console may flash a message at set hours. That prompt is a useful nudge, but it’s counting time, not judging the deck. Do the hand-slide check anyway.
Avoid household lubricants such as cooking oil, penetrating sprays or all-purpose oil on a treadmill deck, and don’t assume a spray silicone from a hardware aisle is the same as a belt-specific product. Wrong products can leave residue that makes a belt slip, attract dirt or damage the backing. If the manual names a product or a type, buy exactly that.
Over-lubrication is a real thing
More is not better. Too much lubricant can pool, squeeze to the edges, and make the belt slip under load. A slipping belt feels like a hesitation, a surge or a sudden slow-down under your foot. It also attracts dust fast. If you see lubricant dripping from the sides or collecting on the floor, you’ve used too much; wipe it away and use less next time. For a deeper look at hesitation and stops, see our guide to treadmill belt slipping and stopping.
Belt Alignment and Tension, Step by Step
Every belt wanders a little. Uneven footfalls, a slightly unlevel floor and plain manufacturing tolerance all nudge it sideways. Healthy treadmill maintenance accepts that and corrects small drift early, before the edge rubs the frame and frays. A belt that sits centered with a thumb’s width of clearance on each side is doing its job.
How to tell the belt is off
Look at the gap between the belt edge and the side rails at the rear of the deck. Equal on both sides is the goal. If one side nearly touches the frame, or the belt has crept onto the rail trim, it needs adjusting. You may also hear a soft scrape, see fine rubber dust on one side or notice the belt edge looking shiny and rolled.
The quarter-turn method
Alignment adjusts the rear roller’s angle with one or two bolts at the back of the frame. Because the belt responds slowly, patience beats force. Turn a bolt a quarter turn, run the belt, then watch. Resist the urge to crank it. Overcorrection is the usual reason owners chase a belt from one rail to the other for half an hour.
- Find the right bolts.Locate the two rear adjustment bolts on each side of the end cap. Confirm in your manual which tool and direction applies.
- Run the belt at a slow speed with nobody on it.Many manuals suggest around 2 to 3 mph. Stand to the side and clip the safety key to your clothing.
- Observe for a full minute.Watch which way the belt moves and how fast. A slow drift needs a small nudge.
- Adjust by about a quarter turn.Typically, if the belt moves toward the left rail, you turn the left bolt clockwise or the right one counterclockwise, but manuals differ. Use yours.
- Wait, then repeat.Give the belt a minute or two to settle after each nudge before the next one.
- Stop when it holds center.Test with a slightly higher speed, then step on and walk to make sure it still tracks under weight.
The belt and rear roller can pull in a loose cuff or finger without warning. Keep your hands clear of the pinch zone while it’s moving and make small bolt turns with the belt stopped if the manual allows. If the belt won’t center after a couple of careful tries, stop and look for a different cause rather than forcing it.
Belt tension in treadmill maintenance: snug, not tight
Belt tension and alignment are linked, and manufacturers handle them differently. Many models use the same two rear bolts for both. A belt that is too loose can hesitate or slip under a hard footstrike. One that is too tight strains rollers and bearings and runs hot. The common rule in manuals is to lift the belt at the middle of the deck and check that it rises only a few inches, but the number varies, so use yours.
If you tighten both bolts equally to remove slack, count the turns so you can undo them if it goes wrong. Loosening is easier than guessing. If the belt keeps slipping after a proper adjustment, the culprit may be the drive belt under the hood or worn rollers, which is a service issue rather than a home fix.
Why a belt keeps drifting after adjustment
Persistent drift usually has a physical reason, and treadmill maintenance should look for it. The floor may be unlevel, one foot may be off the ground, or the user may consistently load one side by leaning on a rail or favoring one leg. A bowed or damaged rear roller can also steer the belt. Before touching another bolt, check that the frame is level side to side with a small level, adjust the leveling feet if the model has them, and see whether the belt calms down.
If you’re a runner who lands harder on one foot, a slight lean toward that side is normal and worth correcting by technique rather than hardware. If you’re the tall walker using a short deck, you may be crowding the rear and nudging the belt. Our treadmill belt size guide explains how deck length and stride interact.
The Ten-Minute Monthly Treadmill Maintenance Inspection
Once a month, give your treadmill maintenance routine a short, systematic once-over. The order matters less than the habit of looking. Use the unplugged state for the physical checks and a brief powered test at the end. Most problems announce themselves as something loose, worn, dusty or oddly warm.
Frame, rails and fasteners
Grip each handrail and try to rock it gently. A bit of firmness is good; clunking or play means a bolt has worked loose. Tighten fasteners snugly with the correct tool and stop at firm resistance. Overtightening strips threads and cracks plastic. Look at the side rails and end caps for cracks and check that rubber feet are intact and all touching the floor.
Fold-down machines add a hinge and latch to check. If you own a folding model, test the locking pin or latch every month, look for bent hardware and make sure the gas-assist or hydraulic arm isn’t leaking oil. Our folding treadmill guide covers what you give up with that convenience, including a bit more hardware to watch.
Belt condition
Run your eye along the belt’s top surface and edges. Look for frayed threads, cracks, bubbling layers, glossy patches where the texture has worn flat and a visible seam that’s lifting. Glossy spots in a walker’s footprint zone are normal wear, but a belt that has become smooth enough to feel slippery is nearing replacement. Check the underside too, if you can see it, for flaking or exposed fabric.
- Frayed or curled edges that rub the frame as the belt runs.
- A raised seam or a ridge you can feel through a sock.
- Shiny, slick patches in the foot-strike area.
- Black dust along one side of the deck, a sign of repeated rubbing.
Cord, plug, key and console
Inspect the power cord along its whole length for cuts, flattened spots, discoloration or kinks. A cord that looks fine can still have a plug that runs warm, so feel the plug after a longer session. It should be at most slightly warm. If it’s hot, discolored or loose in the outlet, stop using the machine and have the outlet and the cord checked. We cover outlet planning in more depth in our guide to treadmill electricity use.
Test the safety key by starting the belt at a very low speed, then pulling the key. The belt should stop promptly and the console should show a stop or key message. If it doesn’t, don’t use the machine until you’ve resolved it. Also scroll through the console controls: speed up, speed down, incline up and down, and emergency stop. A sticky or unresponsive button can be a sign of moisture under the membrane.
The clip and tether exist to stop the belt if you fall or step off. If it is lost, broken or the magnet is weak, replace it with the manufacturer’s part before the next session. A taped-down key or a paperclip workaround defeats the whole point of the device.
The powered listening test
Plug the machine in and run it with no one on the belt at a slow, steady speed for a minute or two. Stand beside it and listen. The sound should be even, with a low hum and a soft rhythmic thump from the belt seam. Rubbing, chirping, ticking or a growl that rises with speed are new sounds worth tracking down. Then step on, walk and run at your usual speed and note the same sounds under load.
Smell matters too. A faint new-machine odor is common in the first weeks, but a persistent hot-rubber or burning-electrical smell is a stop sign. Switch off, unplug and let the machine cool. We’ll sort out what each sound and smell can mean in the symptom decoder later.
Make treadmill maintenance a checklist
Write your own treadmill maintenance version on an index card and tuck it behind the console. Something like: shake rails, check feet, look at the belt edges, look at the cord, test key, run empty and listen. It takes ten minutes, and it makes treadmill maintenance feel less like an open-ended chore. When a service person asks what you check, the card is your answer.
Room, Floor and Power Habits That Protect the Machine
A treadmill spends its life in a room, and the room sets half the treadmill maintenance bill. Dust load, floor flatness, humidity, temperature swings and power quality all reach the machine whether you notice them or not. Fixing those costs little, and it makes every other treadmill maintenance task easier.
Level floor, firm mat, clear perimeter
Start with the floor. A machine sitting on a slightly sloped or spongy surface twists the frame a little with every stride, and a twisted frame steers the belt. Check level side to side and front to back with a small level, and adjust the feet if your model has them. A dense, flat mat under the whole footprint also helps protect the floor, cuts vibration and keeps carpet fibers away from the front of the machine.
Keep a clear zone around the treadmill. Many manuals ask for roughly 6 feet behind the unit and a couple of feet on each side, while the exact numbers vary, so confirm yours. That space is a safety buffer and a cleaning lane. If a laundry basket, a cat tree or a stack of boxes sits within arm’s reach, they’ll end up in the rollers sooner or later.
Dust, humidity and temperature
Electronics prefer a room that feels comfortable to people. A garage that swings from freezing to humid, or a basement with visible condensation, speeds up corrosion on bolts and contacts and can leave moisture in the console. If the machine lives in such a space, wipe it down more often, keep it off bare concrete with a mat and think about a dehumidifier. Our guide to the best treadmills for home use covers which rooms suit which setups.
Don’t store the treadmill, folded or not, where sprinklers, windows or roof leaks can drip on it. Avoid covering a warm machine with a fitted cover straight after a session; let the motor cool and the sweat dry first, otherwise you’re sealing in moisture.
Outlets, cords and surge habits
Plug the treadmill directly into a wall outlet that can carry the load, typically a dedicated 15 or 20 amp circuit, depending on the manual. Extension cords and cheap power strips are the usual culprits for warm plugs and brownouts that confuse controllers. If your manual allows a surge protector at all, it will specify a rating; otherwise, the wall is safest. When you’re done, switch the machine off and unplug it if it will sit unused for a long stretch.
Routing matters. Keep the cord away from the belt, away from walking paths and out of the way of vacuum cleaners and pets. Don’t pinch it behind a folded frame or under a wheel. A small cord clip on the wall solves most of that.
A treadmill that gets louder over weeks is telling you something. Dry deck, loose bolts, worn rollers or an unlevel frame all raise the volume. If you live in an apartment, a quiet machine is a courtesy as well as a sign of good health. See our treadmill noise in an apartment guide for floor and timing tips.
Symptom Decoder: Sounds, Smells and Behavior
Owners often describe problems in sensory terms: it squeaks, it smells, it jerks. That’s fine, because those clues point at a short list of causes. The decoder below turns the most common symptoms into a likely cause and a safe first step. It’s a map for the home, not a diagnosis, and anything electrical or tied to the motor goes to the service channel.
Sounds
A light squeak or chirp that rises and falls with your steps is the classic dry-deck sound, and it often calms down after the lubrication steps above. A thudding that matches belt rotation can come from a raised seam or a lump of debris stuck to the belt’s underside. A high growl or whine that rises with speed points toward bearings or the motor, which brings us to the first red flag.
A grinding or knocking from the rear roller, or a squeal that doesn’t change with weight, is more than a lubrication problem. Stop using the machine rather than hoping it clears. A worn roller bearing can seize, shred a belt edge or strain the motor, and a bearing that’s grumbling today costs less to replace than the damage it causes by next month.
Smells
Fresh-from-the-box rubber and a little warm-motor smell in the first week are common. A sharp, lasting hot-rubber odor, an electrical burning smell or visible haze is not. Treat these as stop signs: switch off, unplug, let the machine cool and look for the cause only with the power disconnected. Overworked motors, a dry deck and failing electronics all produce heat.
If the smell recurs after you’ve cleaned, checked lubrication and confirmed the cord is healthy, it’s time for the manufacturer’s service channel. For a closer look at how motor load, duty cycle and heat relate, the treadmill motor guide is a useful companion.
Behavior: drift, hesitation and stops
Drift is an alignment or leveling story, as covered earlier. Hesitation under the foot, a sudden slow-down or the belt stopping while the console keeps running usually points at belt tension, excess lubricant or worn drive components. A belt that stops with an error code may be reacting to overcurrent from friction. Run through cleaning, the hand-slide check and tension before assuming the worst.
Error codes deserve a quick search of the manual’s troubleshooting table. Write the code and what you were doing at the time in your log. If the code returns after a restart, that’s useful information for service. Our full troubleshooting walk-through is in the belt slipping and stopping guide.
When to Stop and Call for Service
The most useful treadmill maintenance skill is knowing where the home job ends. Some tasks are safe, and some can hurt you or the machine. A good rule is that anything involving live electronics, motor internals, structural welds or a drive belt tensioned under the hood belongs to professionals, and most warranties say as much.
Signs that mean stop
- Burning smell, smoke or visible sparks from the motor area or outlet.
- A cracked frame, bent rail or loose weld that you can see or feel.
- A belt that frays heavily or tears along an edge.
- A safety key that doesn’t stop the belt, or a console that acts on its own.
- A plug or cord that’s hot, melted or discolored.
- Grinding, knocking or a jolt that returns after cleaning and lubrication checks.
Warranty, documentation and who does treadmill maintenance
Before you open a hood or replace a part, read the warranty. Some brands void coverage if an unauthorized person opens the motor compartment. Others are lenient on owner treadmill maintenance but strict on proof of use at home rather than commercial settings. Registering the machine when you buy it, keeping the receipt and holding on to your three-line log all make a claim smoother.
When you contact support, give the model, serial number, purchase date, a clear description of the symptom and what you’ve already tried. Photos and short phone videos of the belt, the sound or the error code help a lot. A technician who has already seen the problem can order the right part the first time.
Repair or replace?
Belts, rollers, motors and controllers can all be replaced, and a mid-life treadmill with sound bones is often worth it. A frame problem, repeated electrical faults or a repair bill that approaches the price of a comparable new machine usually isn’t. If you find yourself weighing a new machine, our treadmill buying guide can help you choose a model that suits your use, and the CPSC recall list is worth a look for both old and new machines.
Storage, Moving and Long Breaks
Treadmills don’t love sitting idle any more than they love constant use. A machine parked in a spare room for six months can develop a dry deck, a flat spot in the belt or a stiff folding hinge. Planning for a break takes five minutes and prevents a nasty surprise the day you come back to it.
If you won’t use it for a while
Clean the belt and deck, do the hand-slide check and lubricate if your manual calls for it. Unplug the machine and coil the cord loosely. Check that the surface it stands on is dry and level. If you cover it, use a breathable cover and only after everything has dried. When you return, run the monthly inspection before the first session, then walk slowly for a few minutes before trying your usual speed.
Moving or folding the machine
Moving is where hinges, wheels and cords take abuse. Unplug first and lock the fold latch if your model folds. Lift with a second person and keep your back straight, because even compact machines are heavier than they look. Roll gently over thresholds and don’t drag the unit by its console or rails. After moving, re-level the frame and re-check belt alignment, since a new floor means new geometry.
Folded treadmills sitting upright against a wall should be locked and clear of kids and pets. If you own a model with a gas-assist hydraulic arm, check periodically for oil seepage and a firm hold. Our folding treadmill guide explains the design tradeoffs that make these parts worth watching.
Treadmill Maintenance by Household Type
A treadmill maintenance schedule on paper is fine, but real homes have kids, pets, shift work and a garage that hits 95 degrees in August. The profiles below are hypothetical shoppers, not case studies from real owners. They show how the same routine bends to different lives. Find the one closest to yours and borrow from it.
The daily walker in a condo
Maya (hypothetical) walks 40 minutes every morning on a mid-range folding machine on a living room mat. Her priorities are noise and a clean belt. She wipes the rails after each walk, vacuums weekly, and does a ten-minute check on the first Saturday of each month. Because her use is steady and light, she follows the manual’s longest lubrication interval, with a hand-slide check in between.
The weekend runner with a garage setup
Dan (hypothetical) runs on Saturday and Sunday and on two weekday evenings. His garage has dust, summer heat and a concrete floor. He keeps a dense mat under the machine, vacuums the hood vents every three months and checks the cord for heat. Heat and dust, not mileage, are his main risks, so his schedule leans on cleaning and cord checks.
The family of four sharing one machine
The Ortegas (hypothetical) have two adults, two teenagers and a dog. The belt gets more hours than anything else in the house. They halve every interval in the manual, keep the safety key on a hook and teach the teens to wipe the rails. Their log is on the fridge, and anyone who lubricates writes the date and the hour counter.
The desk walker on a slim pad
Priya (hypothetical) uses an under-desk walking pad four hours a day at a low speed. Dust from the office carpet is her main enemy, and her manual says the belt is not user-lubricated. She vacuums under and around the pad weekly, checks the remote’s batteries monthly and rolls the unit out to wipe the deck edges. Our under-desk treadmill guide covers this category in detail.
What the profiles have in common
Each household found a trigger that fits its day: a Saturday, a seasonal date, a hook for the key. None of them are perfect, and they miss sessions. What matters is that the checks keep arriving. A treadmill maintenance routine that survives a busy month beats an ideal one that dies in week three.
Treadmill Maintenance Mistakes That Shorten a Machine’s Life
Most failures that owners describe after skipped treadmill maintenance trace back to a short list of avoidable habits. They are almost always well-meant, which is why they stick around. Run through this list once and you’ll catch most of the trouble before it starts.
The common ones
- Lubricating without reading the manual. Some belts must never be oiled by the owner, and the wrong product creates its own slipping problem.
- Overtightening belt bolts. More tension doesn’t fix drift. It strains bearings and heats the motor.
- Ignoring small noises. A squeak is cheap to solve this week and costly to solve after it becomes a growl.
- Using an extension cord or a crowded power strip. Warm plugs and voltage drops are hard on controllers.
- Letting dust and pet hair build up around the hood. It acts like a blanket on the motor.
- Soaking the belt or spraying the console. Moisture finds its way into places it shouldn’t.
- Running on an unlevel floor. The frame twists, the belt wanders and the bolts loosen.
- Skipping the log. Without dates, a warranty conversation becomes a guessing game.
Myths worth retiring
A few beliefs circulate widely and cause trouble. One says that more lubricant is always better; it isn’t, as the over-lubrication section showed. Another says that a belt that drifts needs a hard crank; it needs a quarter turn and a minute of patience. A third says treadmills are maintenance-free if you only walk, which overlooks the fact that daily walkers rack up more hours than weekend runners. And a fourth says that a quiet machine is a healthy one, whereas some failures, such as a gradually drying deck, start quietly and only get loud later.
One more worth retiring: the idea that a premium machine can’t need care. Better build quality buys you longer intervals and sturdier parts, but not zero upkeep. If you’re deciding how much machine to buy, our best treadmills for home use guide explains what extra build quality can and can’t do.
Beyond treadmill maintenance: other machines
Treadmills are the heavy hitters of home care, but bikes, rowers and ellipticals have their own chains, bearings and rails. The principle carries over: clean, listen, check, log. For the wider picture of how care differs across cardio types, see our cardio equipment maintenance guide.
Find the manual, write the model and serial number on a sticky note inside the cabinet or on the wall, check that the cord is intact, test the safety key and vacuum under the front of the machine. Twenty minutes, and you’re already ahead of most owners.
Questions Owners Ask About Treadmill Maintenance
How often should I do treadmill maintenance?
Light treadmill maintenance happens after every session, which means wiping the rails and console. Vacuum around the base weekly. Do a ten-minute inspection monthly, and check lubrication and belt alignment every few months or at the interval your manual gives. Heavy use, pets and dusty rooms shorten every interval. The manual’s schedule always comes first, and a short written log makes it easy to stay consistent.
Does treadmill maintenance always include lubrication?
First check whether your model should be lubricated by the owner at all, since some belts are maintenance-free. If it should, unplug the machine, lift the belt edge and slide a flat hand over the deck. A slick, faintly waxy feel is fine. A dry, chalky or grabby feel suggests it’s time. A gummy, gritty feel means clean first. Rising motor strain and a squeak under footfalls are other clues.
What lubricant belongs in treadmill maintenance?
Use the product your manual names, which is commonly a silicone-based lubricant made for treadmill decks. Brand-specific products exist, and some warranties expect them. Avoid cooking oil, penetrating sprays and general-purpose oils, which can leave residue, attract dirt or harm the belt backing. If the manual says not to lubricate at all, believe it. When in doubt, call support with your model and serial number.
How does treadmill maintenance fix a belt that drifts?
Check the floor and frame level first, then follow your manual’s alignment steps. With the safety key attached and nobody on the belt, run it slowly and watch. Turn the relevant rear adjustment bolt about a quarter turn, wait a minute, and look again. Repeat in small steps. Avoid big cranks. If the belt keeps wandering after a few careful tries, look for a worn roller or an unlevel frame.
Can I clean my treadmill with water or household cleaner?
Light dampness is typically fine for the frame, rails and belt surface. Use a barely damp cloth with plain water or a drop of mild soap, then dry. Don’t soak the belt or spray liquid directly on the console or the motor area. Avoid harsh solvents and ammonia-based products unless the manual allows them. When your manual names a cleaner, that is the safest choice.
How long does a treadmill last with regular treadmill maintenance?
Lifespan depends on build quality, hours of use and care, so we won’t promise a number. Well-built machines used moderately and maintained regularly can last many years. Budget machines, heavy shared use and neglect shorten that. Warranty length is a rough signal of how long the maker expects parts to last. Keeping the deck clean, the belt aligned and the electronics healthy is the most effective way to extend life.
Is treadmill maintenance different for a walking pad?
The principles of treadmill maintenance match, with fewer parts. Walking pads are often lighter, with smaller motors and sealed belt systems, and many manuals say not to lubricate them. Cleaning dust from the deck edges and sides is the main job, along with checking the remote, the cord and the belt’s alignment. Because they’re often used on carpet or under desks, dust is the leading enemy. Always follow the pad’s own manual.
When should I stop using the treadmill and call a technician?
Stop for any burning smell, smoke, sparks, a hot or discolored plug, a safety key that doesn’t stop the belt, a cracked frame, or grinding that persists after cleaning. Also stop if the belt is shredding. Unplug the machine, document the problem with photos or a short video, and contact the manufacturer’s support. Don’t open the motor housing unless your manual and warranty allow it.
Bottom Line: Treadmill Maintenance That Fits Your Life
Good treadmill maintenance is small, regular and a little dull, which is exactly why it works. Wipe it, vacuum around it, check the belt and the cord, listen for new sounds and write down what you did. Let your manual set the lubrication and alignment details, and let the symptom decoder tell you when a home fix should stop. A machine cared for this way tends to stay quiet, straight and ready.
Here are your next steps. Find the manual and note the intervals. Put a monthly ten-minute check on your calendar. Run the hand-slide test this weekend and the cord and key checks tonight. If you’re still choosing a machine, start with our guide to the best treadmills for home use, and look up your model on the CPSC recall page before you spend a dollar on parts.
Sources and Further Reading
- CPSC exercise equipment recalls — check your model’s safety history before repairs or purchases
- HHS Physical Activity Guidelines — federal guidance on weekly activity, the reason a machine you can trust matters
- ACSM top fitness trends for 2026 — context on how people are exercising at home
Some links on this site may be affiliate links. If you buy through them we may earn a commission at no extra cost to you. Recommendations are based on the criteria in the article, not payout. This article is general information about equipment care and isn’t medical or professional repair advice; follow your manufacturer’s manual and consult a qualified technician for electrical or motor work. Last reviewed: October 2026.