Power rack vs squat rack sounds like a simple either-or, but the two names cover a whole family of steel frames, and the right pick has less to do with how strong you are than with how you fail a lift, how much floor you own and how high your ceiling sits. A rack is the one piece of strength equipment that protects you when everything else goes wrong. That makes this a safety decision first and a shopping decision second.
This guide is the rack chapter of our strength-training series. We sort out the confusing vocabulary, compare a power rack vs squat rack on safety, space, ceiling height, exercise range and long-term cost, then give you decision rules and a checklist you can carry into any product page. If you are still deciding what to buy first for a home gym, start with our guide to the best home gym equipment for strength training, then come back here to settle the frame.
Quick answer: power rack vs squat rack at a glance
If you train alone and press or squat heavy enough that a miss would matter, a four-post power rack is the safer and more versatile buy, provided you have the floor space and ceiling height. A squat rack (a two-post stand or a half rack) is the better answer when the room is tight, the budget is lower, or your loads are modest and you can add arm safeties.
- Who each fits: power racks suit solo lifters who bench, squat and pull from pins. Squat racks suit renters, small rooms and lighter or occasional barbell work.
- The big tradeoff: a cage buys a closed safety net and a bigger exercise menu. In return it takes more floor, more headroom and more money.
- One-line verdict: in the power rack vs squat rack contest, safety and range favor the cage, while space and cost favor the stand.
- Do before buying: measure ceiling height and the room’s width and depth, then check the maker’s spec sheet for bar clearance and safety design.
Read this first: how we researched this guide
How we researched this. This comparison of a power rack vs squat rack is research-based. It draws on manufacturer specification patterns, federal guidance and the ownership problems that buyers commonly report. We have not hands-tested the frames described here, and we deliberately name no brands or models.
Treat every number as a typical range and confirm it on the spec sheet of the exact rack you are considering. Some links on this site may be affiliate links. If you buy through them we may earn a commission at no extra cost to you. Recommendations are based on the criteria in the article, not payout.
Last reviewed: October 2026. Dimensions, steel gauges, warranty terms and prices change often, and the market has plenty of lookalike frames. Before you buy, search the CPSC exercise equipment recall list for the model name, and confirm current terms with the seller.
What is inside this guide
Power rack vs squat rack: what the names actually mean
Retailers use these words loosely, and that is where most buyers get lost. One site’s “squat rack” is a two-post stand with J-hooks. Another’s is a four-post frame with a pull-up bar and pin safeties, which another seller calls a power rack. The label on the listing tells you very little. The design tells you everything.
Working definitions we use in this guide
To keep the power rack vs squat rack comparison honest, we split the family by structure rather than marketing. A squat stand has two uprights, a base, J-hooks and, if you are lucky, adjustable spotter arms. A half rack has four posts or a long, braced two-post design with a front-facing safety setup and usually a pull-up bar. A power rack (also called a power cage) has four uprights joined at the top, with safeties that span the whole frame.
Under that umbrella sit a few variants. Wall-mounted folding racks bolt to studs or masonry and fold flat. Rack systems add a lat tower, pulley stations or a plate-storage frame to a cage. Both matter, because many shoppers who start the power rack vs squat rack search end up buying one of them.
Why the word “squat rack” misleads
The term suggests a single-purpose machine, as if the frame only exists for squats. In practice almost every barbell lift starts from a rack: bench press, overhead press, rows from pins, rack pulls. A squat rack is simply the lightest, most open version of a frame that every serious barbell routine eventually needs. So the power rack vs squat rack question is really about how much frame you want around that routine.
The phrase “power rack” carries its own baggage. It sounds like gear for competitive powerlifters, which puts off people who just want a safe way to lift heavy twice a week. You do not need to be a powerlifter to benefit from a cage. You need to be someone who sometimes lifts alone.
Why a rack at all?
Federal guidance recommends muscle-strengthening activity that works all major muscle groups on at least two days a week, and you can read the details in the HHS Physical Activity Guidelines. You can meet that with bands, bodyweight work or dumbbells.
A barbell and rack are one way to do it, and a good one for progressive loading, which is why a rack sits near the center of the power rack vs squat rack conversation and why strength gear keeps showing up in annual trend lists such as ACSM’s top fitness trends.
The point of the rack is not that heavy lifting is mandatory. It is that once a bar gets heavy enough to trap you, you want something other than your own wrists between you and the floor.
Anatomy: the parts that decide the comparison
Before we compare, learn the vocabulary, because every spec sheet is built from the same few parts. The standalone drawing below labels them on both frames, front and side, so the power rack vs squat rack differences are easy to spot. Keep it open in a tab while you read product pages.

Uprights, holes and hardware
Uprights are the vertical steel tubes that set everything else. Most home frames use square tube in roughly 2 by 2 to 3 by 3 inch sizes, with wall thickness (gauge) that varies by tier. The holes along the face let you move hooks and safeties. Spacing commonly runs 1 to 2 inches, and some racks use tighter spacing near bench height so you can dial in the bar to the notch.
Hole size matters too. Pins and hardware only fit if the system matches, so check whether a rack uses 5/8-inch or 1-inch holes before you shop for add-ons. Mixing systems is the quickest way to end up with parts that almost fit.
J-hooks and safeties
J-hooks hold the bar before and after a set. Safeties catch it when a set goes wrong. They are not the same job, and a hook is never a safety. Hooks typically carry a plastic or nylon liner to protect the knurling. Safeties come as pins that slide through the holes, straps that hang between posts, or arms that bolt on and reach out toward you.
Everything in the safety section below comes back to this distinction: where the safety attaches, how far it spans and what it asks of a single bolted joint.
Base, crossmembers and pull-up bar
The base determines stability. Cages usually sit on a rectangular footprint or on feet that run front to back, and heavier steel and wider feet resist tipping. Top crossmembers tie the posts together and carry the pull-up bar. In a stand there is nothing above the hooks to tie the posts, so rigidity depends entirely on the feet and, in some cases, on anchoring to the floor.
That single difference, a closed frame vs two free-standing posts, explains most of what follows in the power rack vs squat rack debate.
Power rack vs squat rack side by side
Before we go lift by lift, here is the whole power rack vs squat rack comparison on one screen. Use it as a map. The sections after it explain why each line reads the way it does, and where a particular product might break the pattern.
The quick matrix
Two posts, open sides
Safety: arms or straps if the frame supports them.
Typical size: about 4 by 4 feet and 55 to 75 inches tall.
Best for: squats and presses at moderate loads in small rooms.
Four posts or a braced pair
Safety: pins or arms, with a span that varies by design.
Typical size: about 4 by 4.5 feet and 70 to 80 inches tall.
Best for: lifters who want a pull-up bar and a steadier frame without a full cage.
Four posts, closed frame
Safety: pins or straps across the whole frame.
Typical size: about 4.5 by 4.5 feet and 80 to 92 inches tall.
Best for: solo bench, heavy squats, pin work and long-term growth.
Relative scale: how the power rack vs squat rack options stack up
The meters below compare relative size and cost, not exact numbers. They show direction. A cage is bigger and costs more than a stand, and a half rack sits between them on each line.
How to read the comparison
No row decides the power rack vs squat rack question alone. A stand loses on safety coverage and wins on floor use. A cage does the opposite. So weight the rows by your life. A renter with a neighbor below cares most about noise and floor use, and a solo bencher cares most about the catch zone.
That is why the right answer to power rack vs squat rack changes from household to household. The honest summary is that the cage wins more rows, and the stand wins the rows that rooms and budgets care about.
Safety: how each design handles a missed rep
Safety is the reason the power rack vs squat rack comparison exists, so it gets the longest section. The short version is that both designs can be safe and both can be dangerous, depending on how you set them up. The longer version is that a power rack gives you more ways to be safe by default, while a squat rack asks you to do more of the work yourself.
What a safety actually has to do
A safety has one job: catch a loaded bar at a height that lets you get out from under it. That sounds trivial until you count the ways it can go wrong. The catch point can sit too high, so you cannot reach depth. It can sit too low, so the bar crushes you before it lands. The catch can also fail mechanically, because a bolt shears or an arm bends or a strap frays.
So judge any rack on three questions. Does the safety span the lifter’s path or only touch it at one point? Is it supported at both ends or only one? And can you set the height in small steps? The drawing below shows how three common safety styles answer those questions.
The missed squat
For squats, a well-set squat stand with sturdy spotter arms can be perfectly adequate. You step back, lower, and if you stall you sit slightly lower until the bar settles onto the arms, then you walk out from under it. The arms must be rated for the load, mounted with the hardware the maker specifies and set a notch or two below the bottom of your normal rep.
In the power rack vs squat rack matchup on squats, a cage does the same job with a bit more margin. Pins or straps span the whole depth of the frame, so the bar can land almost anywhere along your walk-out path. That matters when you are tired and your foot position drifts a few inches off the plan.
The missed bench press
Bench is where the gap between a power rack vs squat rack widens. Pressing alone is the riskiest routine most home lifters do, because a bar over your chest has no bail option. A cage lets you slide the bench inside, set the pins just above your chest at the bottom of the rep and press with a hard stop under the bar. Your chest never has to take the weight.
A stand can handle this only if its arms reach far enough toward the bench and adjust to chest height. Many do not, because arms are designed for squat height first. If the spec sheet does not show where the arms sit for bench height, treat that as an open question and ask the maker.
If you press alone, do not rely on “I’ll just dump it to the side” or on a lone wall-mounted arm. A bar with plates on both ends is awkward to tilt, and one loaded end can pin you. Safeties set at the right height are what make solo pressing reasonable.
Where designs fail
A cantilevered arm puts all the leverage on its mounting joint. That is fine inside the rating, and the rating is where you should read carefully. A pin that spans a cage is supported at both ends, so the same load stresses the steel less.
Straps flex and absorb a drop, which is gentler on the bar and quieter, but they wear and need inspection. None of this makes a stand unsafe. It means the power rack vs squat rack safety gap depends on ratings and setup as much as on shape.
Both styles can fail from poor assembly. Loose bolts, mismatched hardware and cracked welds cause more accidents than lifters ever blame on the design. Our power rack safety guide on spotter arms, straps, anchoring and clearances goes into the details.
Do you still need a human spotter?
Safeties handle most failed reps, but a spotter still has uses. Someone nearby can help if you strain a muscle, feel faint or lose your balance in a way the safeties cannot fix. For a household that trains together, a quick rule helps: the lifter says when the set begins, the spotter watches without touching and nobody grabs a bar unless asked.
That human margin matters a little more in the power rack vs squat rack comparison if you use a stand, because the open frame leaves more room for a bar to wander. Even so, do not treat a spotter as a replacement for correct safety height. A hurried helper cannot catch a loaded bar the way a pin can.
Stability, anchoring and tipping
A free-standing two-post stand can tip if you rack the bar unevenly, lean on an arm or put one end of a loaded bar on a hook. Wide feet, heavy steel and a weight horn or ballast tray help. Bolting to a concrete slab, where the maker allows it, adds margin that no spec number can promise.
Cages resist tipping better by shape, because four posts and top ties form a rigid box. Still, light cages can walk across a floor when you do kipping pull-ups or bang a bar into the hooks. If you rent, ask the landlord before you drill, and see our notes on renters later in this guide.
Set your safeties in five steps
- Start empty.Use an empty bar and a warm-up pace. You are testing the setup, not your strength.
- Find your bottom.Squat to your normal depth and note where the bar sits at the lowest point of the rep.
- Set one notch below.Place pins or arms one or two holes under that point on both sides, then confirm both are at the same height.
- Dump-test it.With the empty bar, sit slightly below your bottom and rest the bar on the safeties. Practice walking out from under it.
- Repeat for each lift.Bench and press need their own heights. Make a note of each hole number so you do not guess next time.
Write the hole numbers for each lift on a piece of tape on the upright. It looks a little fussy until the day you are tired and about to set one side a notch off.
Space: footprint, floor plan and working zone
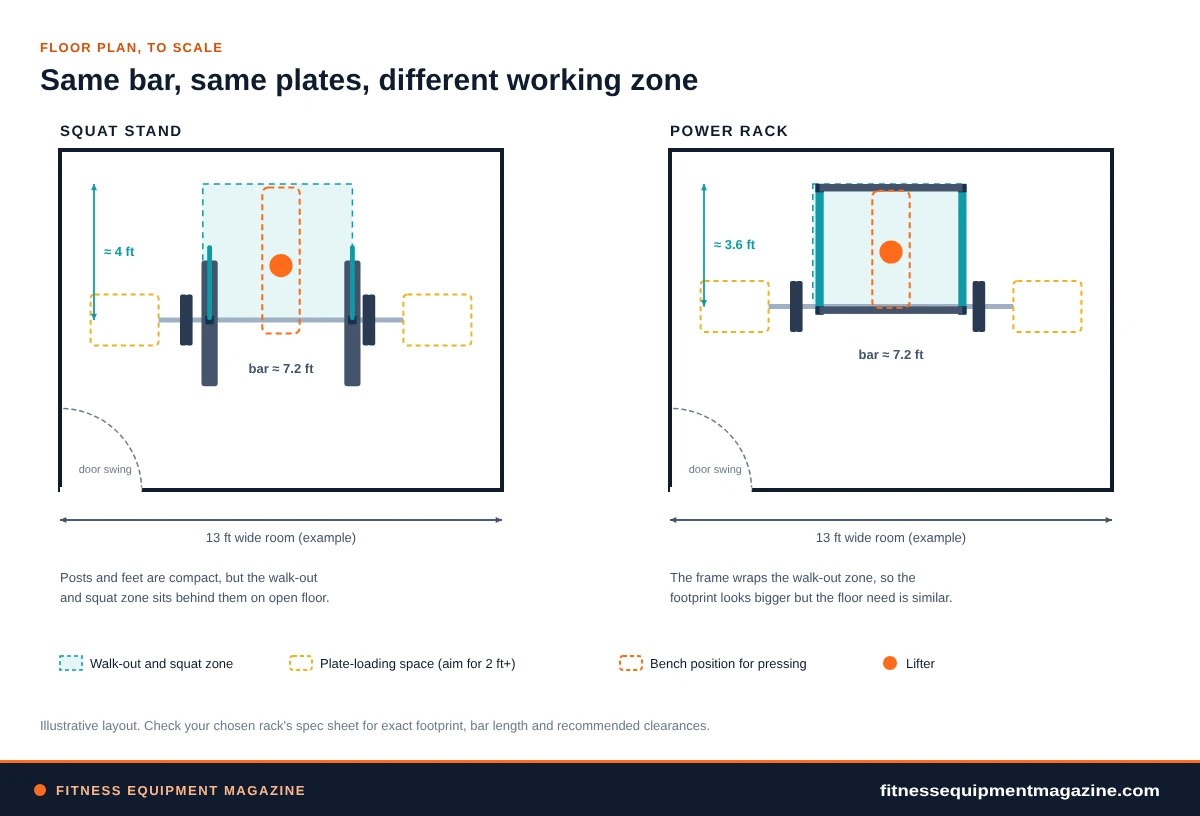
Most shoppers compare the footprint of the frame itself. That is the wrong number. What you need is the clear floor around it, because a barbell is about 7 feet long, plates hang off both ends and you need room to walk the bar out. The next drawing shows the same bar and the same room with a power rack vs squat rack side by side.
The footprint is not the floor you need
A typical squat stand occupies roughly 4 by 4 feet. A typical power rack runs about 4 to 5 feet each way. The difference looks like a foot, and shoppers often decide on it. But the lifter still needs a walk-out zone, and that zone has to exist somewhere.
In a stand, it sits on open floor behind the posts. In a cage, the frame wraps around it. So the stand looks smaller on the listing while the room still needs most of the same square footage. The honest comparison is the total clear floor, not the frame alone. That is the fairest way to judge power rack vs squat rack space needs.
What the working zone includes
- Bar and plates: about 7 feet of bar plus plates leaves your total width near 8 to 9 feet if plates are large.
- Loading room: aim for roughly 2 feet or more on each side so you can slide plates on without squeezing past the frame.
- Walk-out depth: allow about 3 to 4 feet behind the hooks for two steps back and a full squat.
- Bench zone: a flat or adjustable bench needs its own footprint inside or behind the rack, plus space to step off.
Those figures are common planning ranges, not rules. Verify them against the rack’s manual, then add a margin so you can move without turning sideways.
Measure it in four steps
- Tape the frame.Mark the rack footprint on the floor with painter’s tape, using the listed width and depth.
- Add the bar.Lay a broom handle or a 7-foot strip of tape through the hook position to show bar length.
- Add the zone.Mark about 4 feet behind the hooks for walk-out and about 2 feet outside each bar end for loading.
- Walk it.Stand inside the outline and mime the lifts. If you brush a wall, a door or a lamp, resize the plan.
Room-size rules of thumb
Very roughly, a room that is 10 feet wide and 9 feet deep is a workable minimum for either design when you plan to load plates and use a bench. In the power rack vs squat rack decision, that is roughly where the two options converge on floor needs.
Narrower rooms push you toward a folding wall-mount rack, a short-depth half rack or a layout that parks the bench somewhere else. If you have a tighter spare room, our guide to small home gym ideas for spare rooms, bedrooms and apartments shows realistic layouts.
For a wider view of dimensions across a whole gym, see our breakdown of how much space a home gym needs by room size, and for clearances between equipment, our home gym layout guide.
A cage arrives as long steel pieces. Measure stairwells, door widths and any tight turns, and ask what the heaviest single package weighs. A rack that fits the room but not the doorway is a classic and avoidable mistake.
Ceiling height, pull-ups and overhead pressing
Ceiling height quietly decides more rack purchases than money does. A standard 8-foot room measures 96 inches. Add ceiling lights, a fan, a duct or a garage door track and your usable height is lower. A rack that fits on paper can leave you unable to press, hang or even stand it upright during assembly. Ceiling height therefore tilts the power rack vs squat rack decision more often than any price tag does.
Typical heights and what they leave you
Squat stands commonly stand somewhere between the mid-50s and mid-70s in inches. Half racks and cages typically run from about 80 to 92 inches, and some makers sell shorter versions for low rooms. In an 8-foot room, a tall cage leaves a handful of inches above the frame. That is enough for storage and for most squats and benches. It rarely leaves enough for pull-ups.
Pull-ups need the lifter’s head to rise above the bar at the top of the rep. For many adults, that means you want roughly a foot or more of clear space above the pull-up bar. Taller lifters need more. Do the math with your own height and a tape measure before you trust a spec sheet.
The overhead press and the lockout
The bar sits at arm’s length overhead at the top of a press. For many adults that is somewhere around 80 to 90 inches off the floor, and taller lifters can exceed that. Plates do not change the height, but your stance, shoes and any platform do. You also need to check that the bar does not touch a fixture or the frame at lockout.
Inside a cage, you press in the open space between uprights, so the usual risk is the ceiling, not the frame. In a stand, you press in the open, and the same limit applies. If the numbers get close, you can press seated, switch to a landmine press or use a lower-profile frame, all of which are covered in other guides on this site.
How to measure usable height
- Measure from the floor (where the rack feet will rest) to the lowest thing overhead, not to the ceiling itself.
- Subtract mats or a platform if you plan to add them, usually around three-quarters of an inch for stall mats and more for a platform.
- Check where doors, lights and garage openers swing or hang. A bar on its way up can hit them before you notice.
- Stand with your arms up and have a friend measure the height of your fingertips, then add an inch or two for the bar.
- If you plan pull-ups, measure standing height plus reach, then add about a foot for the top of the rep.
Short racks and tall racks
Some makers sell a short-height version of a cage, often in the low 70-inch range, for basements and garages with low doors. You trade a little pull-up room and some tall-lifter comfort for a rack that fits. Short frames can feel more cramped for pressing, and they may offer fewer hook positions, so compare hole counts as well as height.
Tall racks help in a different way. They give a bigger catch zone and more room to hang a pull-up bar at a comfortable height. In a high-ceilinged garage, the extra steel is usually worth the cost, and the power rack vs squat rack decision shifts toward the cage.
When the ceiling wins
A low basement or an older home with a low ceiling is not a reason to quit barbell work. It is a reason to look at short-height cages, folding wall racks or a stand that lets you press seated. Our dedicated guide on ceiling height for power racks, pull-ups and overhead pressing goes deeper, and our basement home gym guide covers ducts, beams and moisture.
Exercises: what each setup lets you do
Here is a fair way to compare a power rack vs squat rack on exercises. List the lifts you actually do or plan to do within the next two years. Then ask whether a stand covers each one safely, covers it with a trick, or does not cover it. You will probably find that the stand handles three or four lifts well and the cage handles everything on the list.
Squats, front squats and zercher work
All three frames handle squats. A stand with arms is adequate, a half rack is a little steadier and a cage gives you the widest catch zone. Front squats work the same way, with the added reminder that a missed front squat dumps the bar forward, so the safeties must reach in front of you. Check where the arms or pins reach before assuming.
Bench press and incline press
In the power rack vs squat rack debate, bench press is the lift where a cage earns its keep. With the bench inside, pins just above your chest and hooks at the right height, solo pressing becomes straightforward. A stand can work if its arms reach far enough and adjust low enough, though the geometry is fussier.
In either case, pair the rack with a bench whose footprint fits inside it. Our guide to adjustable weight benches covers stability and pad gap, and the flat vs adjustable bench comparison helps you pick the first one.
Overhead press and strict rows
Standing presses run from hooks in any frame. Because the bar stays above shoulder height, the main concern is a catch if you lose the lockout. Rows from pins or low hooks, such as Pendlay rows, work well in a cage because you can set the bar at a repeatable height and drop it safely. In a stand, row variations usually need a floor start instead.
Rack pulls, pin squats and partial work
These are cage territory. Pin work needs two things: safeties you can set at many heights and a frame stiff enough to take a bar being loaded from the pins. Some half racks cope. Most two-post stands do not support it without extra parts. If partials, rack pulls or paused work from the pins matter to your routine, treat that as a point for the cage in the power rack vs squat rack tally.
Pull-ups, chin-ups and hangs
Cages and most half racks include a pull-up bar, though bar height, grip width and ceiling clearance vary. A simple stand rarely has one, and adding one to a free-standing two-post frame can be unsafe unless the maker designed the frame for it. Check the spec sheet, and check the ceiling math in the previous section.
Dips, landmine and cable work
Cages accept many bolt-on options such as dip bars, landmine posts, band pegs and cable stations. Stands accept fewer, and some accept none. This is not a reason to buy a cage on day one. It is a reason to buy a frame whose attachment system you can understand, which we cover in the attachments section.
Write down your five most common lifts. Mark each one “stand-ok,” “stand-with-a-trick” or “cage-only.” If the cage-only list has more than one lift you care about, the power rack vs squat rack decision is mostly made.
How your training stage changes the power rack vs squat rack answer
You are not buying for one workout. You are buying for the way your lifting will probably change, and that is hard to predict. Still, strength training follows patterns that make the power rack vs squat rack choice easier. Loads climb, goals narrow and your tolerance for risk shifts.
The first year
New lifters tend to work with moderate loads and build technique, and a squat stand with good arms fits that phase. The bar rarely gets heavy enough to trap anyone, and the lifter is still learning which lifts they enjoy. In this stage, the power rack vs squat rack choice leans toward whatever fits the room and the budget, provided safeties are set correctly.
Years one to three
This is where plateaus and ambitions appear. Weights climb, you add bench work, you begin to train alone more often and pins start to look useful. The loads that matter for safety show up here. If your power rack vs squat rack decision runs through this stage, a half rack or a cage starts to earn its price.
Heavier and longer-term training
Lifters who press and pull close to their limits want the wider catch, the pin work and the stability a cage gives. They also tend to want the attachment ecosystem. By this point the frame is a long-term fixture, so quality of steel and hole pattern matter more than shaving a few inches off the footprint.
Life changes
Moves, babies and shared rooms all change the equation. A cage that suits a garage may not follow you to an apartment. A stand that folds away may suit a house with a toddler but not a lifter pressing heavy. If you expect a move in the next two years, weigh portability heavily, and read our guide on a home gym in a multi-use room for ways to share space.
Buy for the stage you will be in six to twelve months from now, not the stage you imagine in five years. Racks hold their value better than most home gym gear, which makes a step up less painful than people fear.
Build quality that matters in either design
The power rack vs squat rack choice tells you the shape. It does not tell you whether the steel under it is any good. A thin-walled cage can be less stable than a heavy two-post stand, and a heavy stand can be less useful than a mid-weight half rack. So treat shape and build as two separate questions.
All four numbers are typical ranges, shown to teach you what to look for. They are not a standard and they change from maker to maker. Always verify on the spec sheet of the exact frame.
Steel, gauge and tube size
Bigger tube and thicker walls resist flex under a loaded bar and a hard rack. Gauge is a thickness code in which a smaller number means thicker steel, which confuses people. Eleven-gauge steel is thicker than fourteen-gauge. Ask for the actual wall thickness in millimeters or inches if the listing does not state it, because some makers use gauge to mean the tube only and others quote a rating of the whole frame.
What a weight rating really tells you
A capacity number is a claim about a test, not a promise about your garage. Some makers rate static load on the hooks. Others rate the safeties, and the two figures can differ. A rating that applies to a pin does not apply to a lone arm.
In a power rack vs squat rack comparison, the rating on the safeties usually matters more than the rating on the hooks, because safeties take the shock of a failed rep. Read the footnote, look for what the number covers and treat it as an upper bound with a margin of error.
Holes, hardware and tolerances
Laser-cut holes that line up crisply mean the maker pays attention to tolerances. Sloppy holes lead to pins that bind or hooks that tilt. Look for bolt sizes, washers, lock nuts and a hardware pack that is complete. If you read reviews on retail sites, search them for the words “wobble,” “misaligned” and “stripped,” because those problems repeat across brands.
Welds, bolts and finish
Some frames arrive welded in large sections. Others bolt together from many pieces. Welded joints are stiff and bolted joints are convenient, and both can be fine. What matters is how many joints sit under load and how well they are tightened. Powder coat and plating protect against rust, and a coating that chips quickly in transit is a warning sign.
Keep it tight
Bolted racks loosen with use, particularly after the first few weeks. Plan a monthly check with a wrench, and wipe sweat from the uprights. For a routine you can follow, see our guide to strength equipment maintenance for bolts, bearings and rust prevention.
The upgrade ladder: stand, half rack, power rack, system
Most people do not buy one rack for life, and the power rack vs squat rack choice is often just the first rung. They start with a frame that fits the budget or the room, then outgrow it. Seeing the whole ladder helps you decide how high to start and what each step adds. The drawing below shows the four common rungs and what carries over when you step up.
Step one: the squat stand
A stand is the cheapest and most compact way to hold a barbell at rack height. It suits lighter loads, lifters with safety arms who train within their means, and rooms where every foot counts. Its limits are limited catch geometry, fewer attachments and less stability. If your list of lifts is short and your loads are modest, you may never leave this step.
Step two: the half rack
A half rack adds posts, bracing and usually a pull-up bar. It tends to be steadier than a stand and cheaper and smaller than a full cage. The catch is that the safety geometry differs by design, so verify what the safeties span. For many home lifters this is the best middle ground, and some never need more.
Step three: the power rack
The cage adds the enclosed catch zone, pin work, wide attachment support and usually the strongest stability. It also adds footprint, height and weight. If you press heavy alone, if you do rack pulls, or if you share the gym with others who differ in strength, this step pays for itself in confidence. In power rack vs squat rack terms, this is where the cage clearly pulls ahead.
Step four: the rack system
Systems add a lat tower, a low pulley or a pair of cable stations, often within a longer footprint. They fold much of a home gym into one frame. They also fix you to that maker’s ecosystem, and they can be a lot of steel for a room you may leave. For a deeper look at cable stations, see our guides to functional trainers and the cable machine buying guide.
Folding and wall-mounted racks: a closer look
Fold-flat wall racks occupy a foot or less of depth when stowed, which is why they dominate the small-space corner of the power rack vs squat rack discussion. They suit light to moderate loads, but they depend on what you mount them to. Studs, masonry and wall construction decide what they can hold, and a rental lease may rule them out.
Ask for the wall requirements in writing, including stud spacing and fastener type. If the wall cannot meet them, do not improvise. A free-standing stand is a better answer than a rack on a wall that cannot carry it.
If you already know you will want pins, pull-ups and a bench inside the frame within a year, skip step one. A stand that you replace twice costs more than a cage you buy once, and the cost chart later in this guide shows the pattern.
Attachments and add-ons worth planning for
Accessories can double the value of a rack, or they can lock you into a catalog. Plan for them before you buy the frame. A power rack with a tidy attachment system gives you a tool you can grow. A stand with no attachments does one job and does it well, which is fine if that is the plan. Attachment support is the hidden line in any power rack vs squat rack comparison.
Compatibility comes first
Three details decide whether an accessory fits: the tube size of the uprights, the hole size and spacing, and any manufacturer-specific bracket patterns. Two racks that look alike can differ by a quarter inch in tube width, enough to make a bolt-on part useless. Before you buy add-ons from a second maker, confirm all three, and keep your spec sheet handy.
The add-ons most lifters actually use
Lined safeties and strap upgrades
Liners or straps protect the bar’s knurling and soften the sound of a drop. If your rack ships with bare steel pins, this is a cheap and sensible upgrade.
Dip bars
Bolt-on dip handles turn the cage into a pressing station. Confirm the stance width and the weight rating, and make sure your shoulders have room.
Landmine post
A landmine lets you press, row and rotate with one end of a bar. Our landmine attachment guide explains floor units versus rack mounts.
Plate pegs and bar holders
Pegs on the frame hold plates and keep the floor clear. Check the load rating, because heavy plates stress the posts. See home gym weight storage for options.
Band pegs
Band attachment points add accommodating resistance and warm-up options. They are a small part that pays off if you use bands.
Lat and low pulley
Bolting a pulley system onto a cage can replace a separate machine. Compare it with a standalone unit and its footprint before you commit.
Bars that need racks
Some bars play better with a cage than others. A trap bar with high handles sits in many racks, though not all, and some need a specific hook position. If you plan to use a trap bar, our trap bar guide explains rackability, and our best power racks buying guide covers the frame specs that matter.
Plan for a second user
If a partner or an older teen will use the rack, check the lowest hook and safety heights. Some frames cannot go low enough for shorter lifters, and some cannot go high enough for taller ones. A spec sheet that shows the full range of hook heights in inches is a good sign.
What goes with the rack: bench, barbell, plates and floor
A rack alone is a very expensive coat hanger. It earns its place when the bench, bar, plates and floor around it work together. These pairings affect the power rack vs squat rack decision more than most shoppers expect, so it pays to check them before you click.
Does the bench fit inside?
Many cages have about 40 to 48 inches between the uprights, and benches are commonly 12 to 14 inches wide at the pad. The bench therefore fits. What can fail is depth and height. A long incline bench may poke out the back, and a tall bench can leave the bar too close to your chest for the pins to catch. Measure the bench’s footprint and test it empty.
For a stand, the bench sits behind or between the posts. Plan for the spotter arms to line up with your chest, not your hips. Our adjustable weight bench guide lists the stability checks to make before you rack a heavy bar over one.
The barbell and its sleeves
An Olympic bar has 2-inch sleeves, commonly sits around 7 feet long and weighs about 45 pounds. A standard bar has 1-inch sleeves and takes smaller plates. Make sure the hooks and the plate holes match the bar you own. If you are not sure which type you have or want, our Olympic vs standard barbell comparison explains sleeve size, plate fit and capacity, and the barbell buying guide covers knurling, bearings and coatings.
Plates and plate storage
Large-diameter bumper plates change how the bar sits in the hooks and how close it comes to a safety. Iron plates of the same weight are smaller and thinner, so you fit more on a bar. Either way, make sure your sleeves can hold the plates you plan to own. If you need to choose, the weight plate guide and our notes on bumper plates for home gyms help.
Plan where the plates go before they arrive. A rack with plate pegs can solve it. A stand without them needs a plate tree or a corner shelf, and either takes floor space that your layout should reserve.
The floor under it
Racks sit on a floor that has to carry steel, plates and a lifter, and that sometimes takes impact. Rubber mats protect the floor and keep the frame from sliding. Thin mats help with noise but not with heavy drops. For a deeper look, see our home gym flooring guide on rubber rolls, tiles and mats.
Mats raise the floor height, so subtract their thickness from your ceiling math. A platform can add several more inches, and a tall cage on a platform may no longer fit under a low ceiling.
Noise, floors and where the rack lives
Where you put the rack changes the power rack vs squat rack pick more than people admit. A garage tolerates a cage the size of a small shed. A bedroom might not tolerate a bar landing on pins at 6 a.m. Think about the neighbors, the floor and the weather before you think about steel.
What each design sounds like
A cage tends to be louder when something goes wrong, because steel meets steel along a longer span. A stand with arms makes less noise in a normal set, but a bar dumped onto an arm can ring through the frame. In both cases, the real noise comes from dropped plates and bar rattle in the hooks, not from the frame itself.
Liners, rubber mats and quiet racking habits do more than any choice in the power rack vs squat rack debate. Rack the bar gently, avoid dropping it and treat the safeties as an emergency tool, not a way to end a set.
Garage
Garages are the home turf of the power rack. There is usually the floor space, the concrete slab for anchoring and a ceiling that is at least a few inches higher than a bedroom’s. Temperature swings are the real hazard, because steel gets cold and sweat leads to rust. Our garage gym guide covers flooring, humidity and power. In a garage, power rack vs squat rack mostly comes down to ceiling height and budget.
Basement
Basements often have good floors and poor ceilings. Ducts, beams and sump pumps eat height and corners. A short cage or a half rack can make sense. Moisture is the other issue, so protect steel with a dehumidifier or a regular wipe-down. See our basement home gym guide for specifics.
Apartment or upper floor
A dropped bar travels through a building. If you live above someone, a rack that encourages dropping is a poor fit, and a stand with arms may serve you better because you will lift conservatively. Rubber floors and bumpers help, but they do not replace judgment. Start with our guide to the apartment home gym, then read about home gym noise reduction for dropped weights and vibration.
Weight matters on upper floors too. Concentrated loads sit differently on a wood-frame floor than on a slab. Our home gym floor load basics explains what to ask a building owner or an engineer.
Renters
If you rent, anchoring is probably off the table, and a wall-mounted fold-flat rack may need studs you cannot drill. That pushes you toward a free-standing frame with a wide base and a weight tray. Read the lease, ask the landlord and see our guide to a home gym for renters for non-permanent options.
Cost over time: buy once or step up
Price comparisons between a power rack vs squat rack look simple until you count the second purchase. A lighter frame costs less today. A frame you outgrow costs more over time. We will not quote prices, because they shift and vary by retailer, but we can show the shape of the math using index units.
Reading the chart
Path A is the cheapest and perfectly fine if a stand will always cover your needs. Path B often ends up the most expensive, because you pay for two frames and recover only some of the first. Path C costs more today and less than B over time, provided you really would have outgrown the stand.
The lesson is not “buy the biggest rack.” It is “be honest about which path you are on.” Many lifters guess wrong in both directions. Notice that the power rack vs squat rack price gap shrinks once you count a second purchase.
What drives the price
- Steel and size: more tube, thicker walls and bigger footprints cost more to make and to ship.
- Freight and delivery: heavy items often add shipping charges or need delivery appointments.
- Attachment ecosystem: a catalog of compatible parts adds long-term value, and sometimes extra cost.
- Finish and hardware: better coatings, laser-cut holes and lined safeties raise the price of quality.
Buying used
A used cage can be a bargain because steel lasts. Inspect welds for cracks, uprights for bends and holes for elongation, and ask whether the frame has taken heavy drops. Search the CPSC list for the model name first. Take a tape measure and the pins with you, and test the fit before paying. Disassembly and transport add effort, so factor those in.
Where the rack sits in your budget
The rack is rarely the first purchase on a limited budget. A bar, plates and a bench come first, and a rack often lands second or third. Our home gym budget guide lays out an equipment order for several budget levels, and our home gym equipment guide shows how a rack fits in the whole picture. If you are planning a whole room, how to build a home gym walks through space, flooring and expansion.
Assembly, anchoring and the first-week checks
Many owners treat assembly as a chore to rush. It is the most important safety step in the entire power rack vs squat rack decision, because a perfect frame built carelessly is a poor frame. Plan an afternoon, clear the room and read the manual before you open a bolt bag.
Before the box arrives
- Clear and mark the floor where the frame will sit, using the footprint and the working zone.
- Gather basic tools: a socket set or wrench, a rubber mallet, a level and a helper for lifting.
- Check the delivery path and the staging spot, because uprights are long and awkward.
- Keep the manual, the parts list and the maker’s contact details in one place.
An assembly order that avoids rework
- Sort the hardware.Lay out bolts by size and count them against the list before you start.
- Build the base first.Assemble feet and bottom rails and leave bolts finger-tight so the frame can square up.
- Raise the uprights.Attach posts to the base, then add the top ties and crossmembers.
- Square and tighten.Check for diagonal measurements being equal, then tighten every bolt in a cross pattern.
- Add hooks and safeties last.Install them at the heights you noted earlier, with the lined side facing the bar.
Leveling, wobble and anchoring
Set a level on the base and shim any gap with rubber, not wood. A small rock at the feet becomes a big rock under load. If the maker supports anchoring, use the anchors the manual specifies, and respect floor type and thickness. Never anchor into a floor that you have not confirmed can hold the hardware.
Free-standing racks benefit from weight on the base. Many makers sell weight trays or pegs, and plates stored low on the frame make it harder to tip. This applies to a stand and a cage, although the stand benefits more.
A first-week test routine
- Day one: empty bar.Rack and unrack the bar ten times and confirm nothing shifts.
- Day two: load light.Add plates evenly and repeat, then drop-test the safeties with the empty bar.
- Day three: recheck bolts.Tighten anything that moved. Bolts often settle on day one.
- Day seven: full review.Look for scratches in the finish, creaks, bent liners or any hole that looks stretched.
Treat any wobble, creak or cracked paint as information. Fix it or contact the maker before you lift heavy.
Eight hypothetical shoppers and their best fit
Real homes are messier than spec sheets, so here are eight invented shoppers. They are composites for illustration, not case studies, and the numbers are examples. Find the one closest to you, then check your own measurements. Each shows how the power rack vs squat rack answer shifts with the room and the routine.
The second-floor renter
Maya lifts three times a week in a one-bedroom apartment, with a neighbor below and a lease that bans drilling. She presses and squats moderately and never trains to failure. A free-standing squat stand with adjustable arms, a good mat and a bar she lowers rather than drops suits her. She skips the cage because the floor, the lease and the neighbor all say no. Her stand folds to a corner in minutes.
The garage bencher who trains alone
Dev has a two-car garage, a concrete slab and a habit of pressing at 6 a.m. with nobody else home. For his power rack vs squat rack choice, a power rack with pin safeties and the bench inside is the plain answer. He spends the difference on the bench and on lined safeties, because bench is the lift where solo failure costs the most.
The tall lifter with a low basement
Tomas is 6 foot 4 and has a basement ceiling that, once he subtracts a duct, comes to about 88 inches. A tall cage will not fit, and overhead pressing is already tight. He needs a short-height cage or a half rack that tops out below the duct, plus a seated press option. He measured first, which saved him a return shipment.
The couple of different sizes
Priya is 5 foot 2 and her partner is 6 feet tall. They share a spare room. The deciding detail is hook range: low enough for her bar height, high enough for his, with safeties that follow. A power rack with full-length hole patterns solves it. Our guide to a home gym for two people covers how to avoid buying duplicates.
The parent with a toddler
Sam has a four-year-old who loves anything with a bar. For this household, a rack that folds flat or stands against a wall changes the risk. A stand with lockable arms or a wall-mounted fold-flat frame fits, and the plates go in a locked cabinet. A cage is fine only if the room has a door that closes. Our family home gym safety guide covers storage and access.
The budget-first beginner
Chen is new to barbells and has a modest budget. The order he follows is bar, plates, bench, then a stand with arms, and he leaves the cage for later. He accepts that his stand covers four lifts well and excludes rack pulls. If he finds he loves lifting, he will upgrade with eyes open.
The returning lifter in his fifties
Walt took years off and wants to lift again with a sensible margin for error. He is not chasing records. A cage gives him a predictable catch and removes the worry about a bail. He takes the lowest safeties for squats and starts light. If you have health concerns, check with a qualified professional before you start any new program.
The minimalist
Ana wants the fewest objects in her house. A fold-flat wall rack, one bar, one set of plates and a bench that tucks away cover her. She checks the stud spacing, confirms the mounting hardware and accepts the limits. Our guide to the minimalist home gym shows how far a small kit can go.
A decision framework for power rack vs squat rack
Use this section when you are tired of reading about power rack vs squat rack and want a verdict. Work through the steps in order, and stop at the first one that settles the question.
- Do you lift alone, and heavy enough that a miss matters?If yes and you bench or squat near your limit, lean power rack. If you stay well inside your limits, a stand with arms may do.
- Does a cage physically fit?Check ceiling, floor space and delivery path. If the cage fails any of the three, move to a half rack, a short cage or a stand.
- Which lifts do you need?If pins, rack pulls or a built-in pull-up bar matter, lean to a half rack or a cage. If you only squat and press, a stand covers it.
- Can you anchor or add weight?If you cannot bolt down, favor a wide base with a ballast tray. That favors the cage or a heavy half rack.
- What is the cost of being wrong?If a stand might force a second purchase within a year, buy the next step now. If not, save the money.
The tradeoffs in one view
Power rack strengths
- Closed safety net for solo lifting
- Widest exercise range, including pin work
- Strongest stability and attachment support
- Often includes a pull-up bar
Power rack tradeoffs
- Larger footprint and weight
- Needs more ceiling height
- Higher cost and heavier delivery
- Harder to move or store
Squat rack strengths
- Smaller footprint and lower cost
- Easier to move, store or fold
- Lower ceiling demands
- Often enough for squat and press work
Squat rack tradeoffs
- Open design asks more of you on safety
- Fewer exercises and add-ons
- Stability depends on feet and setup
- May need a second purchase later
If you would be nervous leaving the bar alone on the safeties and walking away, you have already told yourself which frame you need.Editorial view, not a rule
Tiebreakers when power rack vs squat rack is a close call
- Choose the frame with the better safety design over the one with the better extras.
- Choose the frame whose parts you can still buy in three years, over a one-off design.
- Choose the frame with a clear manual, a hardware list and a warranty you have read.
- Choose the frame that fits the room with a margin, not by a quarter inch.
Mistakes and myths in the power rack vs squat rack debate
Most regret in the power rack vs squat rack decision comes from a short list of avoidable errors. Most bad advice comes from an equally short list of repeated myths. Here are both, so you can spot them in a product page or a forum thread.
Ten mistakes that sink rack purchases
- Buying for the lifter you hope to be. A cage that dominates a small room becomes a clothes hanger. Buy for the next year, not the next decade.
- Trusting the capacity number blindly. A rating without a footnote tells you very little about hooks, safeties or arms.
- Skipping the ceiling math. Measure the lowest thing overhead, not the ceiling, and subtract mats and any platform.
- Setting safeties by feel. Test with an empty bar and write down hole numbers.
- Mixing hole sizes and tube widths. Add-ons that almost fit are worse than add-ons that clearly do not.
- Forgetting the bench. A cage that cannot hold your bench defeats the point of the cage.
- Ignoring delivery. Long, heavy boxes meet tight stairwells and narrow doors.
- Not anchoring when you could. If your maker supports bolting to concrete, it is a cheap margin.
- Never rechecking the bolts. Frames loosen. Put a wrench check on the calendar.
- Buying on looks and bundles. A bundle with filler parts can cost more than buying the right pieces separately.
Seven myths about the power rack vs squat rack choice
“Squat racks are unsafe.”
A stand with sturdy arms, set correctly, is safe enough for many lifters. It asks more of you, and it gives you fewer options for bench and pin work.
“Power racks are for powerlifters.”
Anyone who lifts alone gets value from a catch zone. Competitive goals are optional.
“Thicker steel is always better.”
Thicker steel resists flex, but joint design, base width and hardware quality matter as much. A heavy frame with sloppy holes is still a sloppy frame.
“A pull-up bar means it is a full cage.”
Many half racks and even some stands include one. Look at post count and safety span, not the bar.
“Higher rating means safer.”
A big number can describe a part you will never use. Ask what it applies to, and how it was set.
“Safeties replace spotters.”
Safeties handle many failures. They do not help with every form issue, and a trained spotter can add margin for some lifts.
“You never need to bolt it down.”
Many heavy cages stay put. Light frames and stands may not. Read the manual for what the maker expects.
Your pre-checkout checklist
Run this power rack vs squat rack checklist before you pay. Print it if you like. Each line catches a problem that other buyers have reported, and each takes only a minute.
- I have measured usable ceiling height, room width and depth, door widths and the delivery path.
- The spec sheet states upright size, steel thickness, hole size and spacing, and weight rating details.
- I know whether safeties are pins, straps or arms, what they span and how they attach.
- The hook and safety height range works for every lifter who will use the rack.
- My bench, bar and plates fit inside the working zone I measured.
- I have confirmed attachment compatibility, and the maker still sells the parts I want.
- The warranty text covers the frame, the welds and the finish, and I know who to call.
- I searched the CPSC exercise equipment recall list for the model name and the maker.
- I have a plan for flooring, anchoring or ballast, and noise.
- I can describe, in one sentence, why this frame beats the next step up or down.
For the full process of measuring, buying, installing and testing a gym, see our home gym setup checklist. If you are still comparing specific frames, the best power racks guide goes into stability, hole spacing and attachments in more depth.
Questions to ask a seller
- What exactly does the weight rating apply to: hooks, safeties, the whole frame?
- What is the wall thickness of the uprights and the base in millimeters or inches?
- Are replacement parts and add-ons stocked, and for how many years?
- What is the heaviest box, and what does delivery include?
- Can I return it, and who pays for a heavy return?
How to read rack reviews without being fooled
Customer reviews help, but they need filtering. Look for comments from people who have owned the rack for a year or more, because assembly-day enthusiasm says little about long-term stability. Search for the words “wobble,” “stripped,” “paint chipped” and “customer service” to see recurring patterns.
Be careful with star averages, since many owners rate the box and not the rack. A review of delivery speed tells you about the carrier. In a power rack vs squat rack search, the most useful reviews describe the lift, the room and the bolts after six months, and they come from people whose setup resembles yours.
When neither a power rack nor a squat rack is the right buy
Sometimes the best answer to the power rack vs squat rack question is not to buy either one. If your space is tiny, your ceiling is low, your budget is tight or your training is mostly dumbbell-based, other choices make more sense.
If a guided bar sounds safer
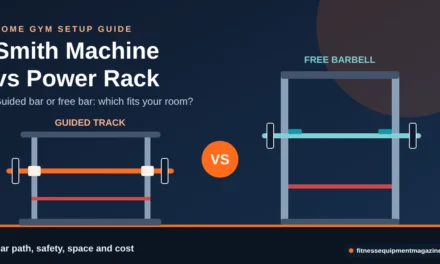
A Smith machine holds the bar on fixed rails. Some buyers like the built-in catch. Others dislike the fixed path. It is a different tool, and our Smith machine vs power rack comparison goes through it in detail.
If dumbbells cover your plan
A pair of adjustable dumbbells and a bench give you a lot of work in a small space, with no bar to drop. See our adjustable dumbbell guide for the checks that matter.
If you want a cable-based gym
If most of your work is pulling, pressing and accessory moves, a functional trainer may serve you better than a barbell frame. You can always add a rack later, and many people do.
Delaying a rack until you have the room, the ceiling and the budget is a smart plan. The gear you already own will still be useful when the rack arrives.
Power rack vs squat rack: frequently asked questions
What is the main difference in a power rack vs squat rack?
In any power rack vs squat rack comparison, the main difference is structure and safety geometry. A squat rack is usually a two-post stand or a half rack, open on at least one side. A power rack is a four-post cage with safeties that span the whole frame. The cage gives you a closed catch zone, more exercises and stronger stability, while the squat rack saves space and money.
Is a power rack safer than a squat rack?
For solo lifting, usually yes, because safeties are supported at both ends and the bar can land almost anywhere along your path. A squat stand with sturdy arms, set at the right height, can still be safe for moderate loads. Both depend on correct setup, so test your safeties with an empty bar and recheck your hardware regularly. If you lift alone and push heavy loads, the cage gives you the larger margin for error.
Can I bench press safely in a squat rack?
Sometimes. It depends on whether the arms reach your chest position and adjust to the right height. Many stands are built for squat height first, so the geometry for bench is fussier. If you press heavy and alone, a cage with pin safeties is the more dependable choice. Check the manual for bench instructions before you rely on any setup, and always test the height with an empty bar first.
Do I need a power rack if I only squat?
Not necessarily. A squat stand or half rack with good arms covers a squat-focused routine. The cage becomes more attractive if you add bench, rack pulls or pull-ups, or if you train alone at loads that would trap you. Think about what you will do in the next two years, not only today, because the power rack vs squat rack choice should follow your plan and not your current routine.
How much space does a power rack need compared with a squat rack?
A typical stand takes roughly 4 by 4 feet and a typical cage about 4 to 5 feet each way. The real need is larger, because a 7-foot bar, plate loading room and a walk-out zone all need floor. For power rack vs squat rack planning, expect roughly 10 by 9 feet for either design, and verify against the spec sheet.
What ceiling height do I need for a power rack?
Cages commonly stand 80 to 92 inches tall, so a standard 8-foot ceiling leaves little room. Pull-ups usually need an extra foot or so above the bar, and overhead presses need clearance at lockout. Measure the lowest obstruction overhead, subtract mats, and look at short-height models if your ceiling is low. Remember that a platform or thick mats raise the floor and cost you height, so include them in the measurement.
Should I bolt a rack to the floor?
If the manufacturer supports it and you own the space, anchoring adds a margin of stability, especially for lighter frames and for lifters who kip or rack bars hard. Renters should not drill without permission. Heavy cages often stay put unbolted, but follow the manual and consider a weight tray for ballast. If the maker does not mention anchoring, ask before you drill, because the wrong hardware can crack a slab.
Is a half rack a good compromise in the power rack vs squat rack debate?
For many home lifters, yes. A half rack usually adds bracing and a pull-up bar to a stand, costs less than a full cage and takes less floor. Check what its safeties span and whether pin work is supported, because designs vary a lot. A half rack with arm-style safeties behaves much like a stand, while one with pins across the frame behaves much more like a cage, so read the details before you decide.
Will I outgrow a squat rack?
You might, if you start pressing heavy alone or want pin work and pull-ups. You might never, if your loads stay modest and your routine is simple. Use the cost chart and the five-step framework above to pick a path, and keep your bar, plates and bench because they carry over whichever side of power rack vs squat rack you pick. If you are unsure, start with the safest frame your room allows and add attachments later.
Conclusion: choosing between a power rack and a squat rack
If you remember only a few things, make them these. In the power rack vs squat rack contest, a power rack is the safer, more versatile frame for solo lifters who have the floor and the ceiling. A squat rack is the smart answer when space, budget or a lease says otherwise, as long as you set the safeties carefully and accept the limits. Measure first, check the hardware, and be honest about which path you are on.
Whichever side of the power rack vs squat rack question you land on, the frame is only one piece. Pair it with a bench, a bar and a floor that suit the room, and revisit our strength equipment buying order when you decide what comes next. Check current specs, warranty terms and prices with the seller before you commit.
Sources and further reading
- Physical Activity Guidelines for Americans (HHS) — federal guidance on weekly muscle-strengthening and aerobic activity.
- CPSC: Exercise Equipment recalls — the public recall list to search before you buy.
- ACSM: Top Fitness Trends 2026 — general context on where strength training sits in the fitness industry.
- Manufacturer owner’s manuals and spec sheets for any frame you consider. They are the final authority on dimensions, anchoring, ratings and warranty terms.
Editorial note: this article is research-based guidance, not a product test, and it names no brands. Some links on this site may be affiliate links. If you buy through them we may earn a commission at no extra cost to you. Recommendations are based on the criteria in the article, not payout. Last reviewed October 2026. Specifications, prices, warranties and recalls change, so verify them with the seller and the CPSC before you buy.