A useful treadmill incline guide starts with an unglamorous fact: the number on your console is a percent of grade, and almost nobody explains what that percent means. So people tap the up arrow, feel something change, and guess. This treadmill incline guide slows that down. It covers what each grade tends to feel like, why a treadmill hill is not quite an outdoor hill, how machines differ, and how to climb without gripping the rails like a sailor in a storm.
The short answer in this treadmill incline guide
The short answer
The short version of this treadmill incline guide: incline is grade, meaning feet of rise for every 100 feet of travel, shown as a percent. Small numbers feel bigger than they look. Most people notice 3% within a few minutes, 5% reads as a real hill, and 10% or more changes your posture, your pace and your breathing at once. The fix for almost every incline problem is the same. Go up in small steps, slow down as the grade rises, and keep your hands off the rails.
- Who it fits: walkers who want variety without more speed, runners who want hill work indoors, and anyone choosing between machines with different incline ranges.
- The biggest tradeoff: more grade means more effort per minute and shorter, slower steps, so it rewards patience over ambition.
- The most skipped step: reading what your own console actually reports, including whether the display shows the target or the real deck position.
How we researched this treadmill incline guide
Evidence level. This treadmill incline guide is research-based guidance built from manufacturer specification patterns, federal guidance and ownership problems commonly reported by buyers. We haven’t hands-tested the machines described here, so you won’t find lab numbers or “we tried it” claims. Feel descriptions are general and qualitative, and every range is typical, not exact. Confirm details against your manual. Some links on this site may be affiliate links. If you buy through them we may earn a commission at no extra cost to you, and recommendations are based on the criteria in the article, not payout.
How current is this treadmill incline guide?
Last reviewed: October 2026. Incline ranges, console features and warranty terms change with every model year. Treat the numbers here as starting points, and check the CPSC exercise equipment recall page before you buy or restart a machine that has been sitting unused.
What is inside this treadmill incline guide
What incline means: rise over run, in plain numbers
Strip away the console and a treadmill incline is a ramp. The front of the deck lifts while the back stays put, so the belt tilts upward like a very short hill. Everything else in this treadmill incline guide hangs on one idea, so it is worth getting clear before anything else.
Grade is rise divided by run
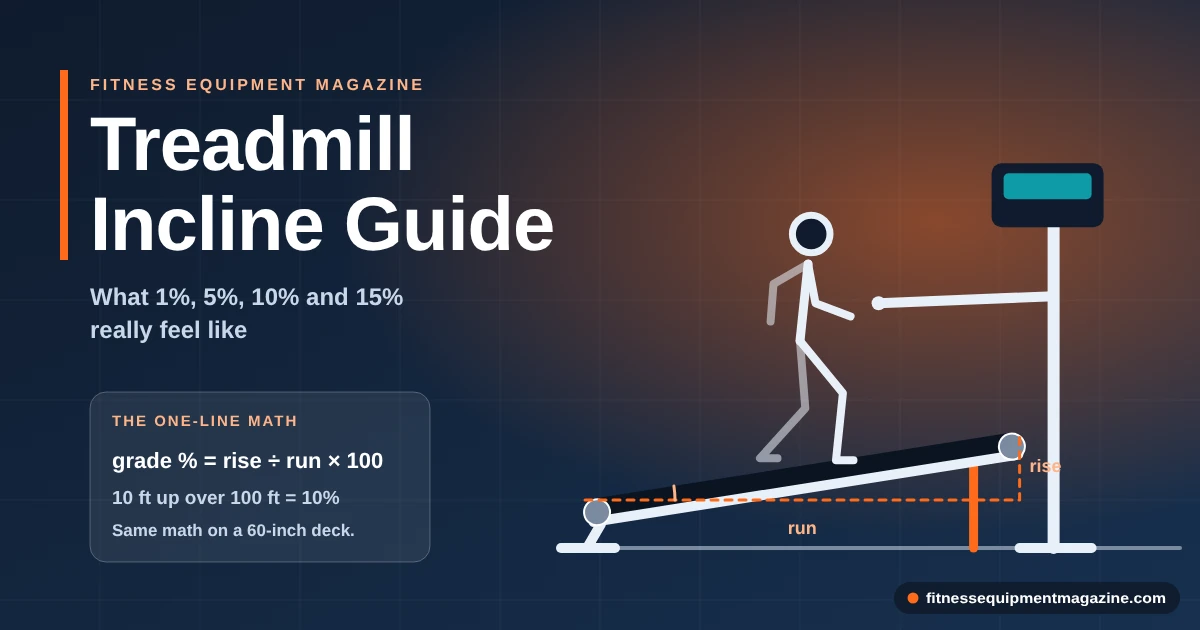
Grade compares how far you climb to how far you travel. Climb 10 feet while covering 100 feet of ground, and you have a 10% grade. Climb 5 feet over the same distance and it is 5%. The units cancel, so inches over inches or meters over meters gives the same percent. That is all the console is reporting.
On a treadmill, the “run” is the length of the deck, and the “rise” is how far the front lifts above where it sat at 0%. A typical 60-inch deck at 10% lifts the front roughly 6 inches. At 15% the lift is closer to 9 inches. Those are illustrative figures, because deck lengths and lift geometry differ, but they explain why a few clicks on the console can feel so large under your feet.
Percent is not degrees
This trips people up more than anything else. A 10% grade is not a 10-degree slope. It is closer to 5.7 degrees. A 45-degree ramp, which you would hardly want to walk, is a 100% grade. So the whole usable treadmill range of roughly 0% to 15% sits inside a gentle-looking sliver of angle, about 0 to 8.5 degrees.
That is exactly why photos of treadmills at 15% look underwhelming. The angle really is small. What changes is the work your legs and lungs do to lift your body weight with every single step, and that work adds up quickly.
Why 0% is not the same as outdoor flat
You may have heard that setting a treadmill to 1% mimics level ground outdoors, because there is no wind to push against. It is a long-standing rule of thumb among runners, and it is a reasonable one for faster running. Slow walkers rarely need it. Air resistance at walking speed is small enough that most people skip the trick without losing anything.
The practical point is simpler. Treat 0% as the baseline of the machine, not as a measured truth about the world. If you want to compare today’s session with last month’s, compare console to console on the same machine. Compare against other machines or outdoor routes only loosely, a point this treadmill incline guide returns to in the calibration section below.
Quick mental math
Multiply your speed in miles per hour by 88 to get feet traveled per minute. Then multiply by the grade as a decimal. For example, 3 mph is 264 feet per minute, and 10% of that is about 26 feet of “climb” each minute. It is a rough yardstick, not a performance number.
What 1%, 3%, 5%, 10% and 15% feel like: the treadmill incline guide ladder
Feel is subjective, and nobody can promise what a given grade will do to you. Fitness, height, stride, shoes, the day you slept badly and the speed you pick all shift the picture. Still, most people describe the same broad pattern as the number climbs, and a rough map beats guessing. Think of this part of the treadmill incline guide as a general ladder, not a prescription.

1%: barely a hill
Most walkers cannot feel 1% at all. The deck is tilted by about half a degree, which is less than the slope of many sidewalks. Its value is mostly habit and bookkeeping. Runners who like the “1% rule” use it as a default, and people who log sessions like a consistent starting line. If a machine’s console jumps straight from 0 to 1, you will not miss the gap.
3%: the gentle rise
Here is where many people first notice something. Calves and the backs of the legs start working a little harder, breathing nudges up, and a walk at your usual pace feels like it has a purpose. Most people can hold 3% for a long steady session without changing their form. It is also where a lot of home treadmills’ manual incline settings land, which makes it a useful reference point if your machine tilts by hand.
5%: a real hill
At 5% the feel changes from “slightly harder” to “this is a hill.” Your stride shortens a touch without you deciding to, you lean from the ankles to stay balanced, and the pace you were happy with on the flat usually drops. Many people find a comfortable steady walk somewhere between 3% and 6% and stay there for most sessions. That is a perfectly good place to live.
If you want to see how that compares with a flat walk, the walking-focused guide to choosing a treadmill for walking explains which machines make this range easy to dial in.
10%: a steep climb
Ten percent is steep enough to dominate everything else. Pace falls a lot for most people, strides get short, and your posture matters more because a slouch at this grade pushes your weight onto your arms. Many walkers find it a short-interval setting, not a place to spend an hour. It is also where the urge to grab the handrails shows up, and where the habit does the most harm to your form, which we come back to in the safe-use section.
15%: very steep
Fifteen percent is the ceiling on many mainstream machines, and it behaves like a staircase. Steps become short and deliberate, the pace is slow, and the effort is high even for people who are otherwise fit. Few people need it, and fewer should start there. If you build up to it gradually and keep your hands free, it is a legitimate tool. If you jump to it on day three because a video made it look easy, expect a bad time.
A note on comparison
Another person’s “5% is easy” tells you almost nothing about yours. Height, stride length, shoes and the pace they chose all change what a grade costs. Use this treadmill incline guide to calibrate expectations, then trust your own breathing and legs. If you have a health condition or you are returning from a layoff, check in with a clinician about how hard to push.
The same grade, different people
Height matters because taller people cover more ground per step, and a steep grade punishes a long stride. Body weight matters because every step lifts your mass. Fitness matters, of course, but so does familiarity: a walker who has climbed stairs for years often handles 8% better than a fit runner who has never tried it. So when a friend says “10% was easy,” ask what pace they chose and how long they stayed.
The treadmill incline guide ladder in four numbers
Treadmill incline vs outdoor hills: what really differs
People often ask whether treadmill percent equals outdoor percent. In the strictest sense, it can. Lifting your body up a 10% grade costs about the same work whether the ground slides under you or you walk across it. Yet in practice the two experiences diverge, and the differences matter when you plan sessions around either, so this treadmill incline guide separates them.
There is no downhill on the treadmill
Outdoors, every climb ends. You crest, the ground flattens or drops, and your legs get a break. A treadmill at 8% stays at 8% until you press a button. That relentlessness makes indoor climbing feel harder than the same numbers outside. If your machine offers decline, it helps you imitate a descent. If it does not, your recovery has to come from lowering the grade yourself.
Wind, surface and footing
The belt gives you a uniform surface. Outdoors you meet roots, loose gravel, wet leaves, curbs and wind. The treadmill is more predictable, which is a strength for learning pacing and a weakness if you are training for rough terrain. Also, because the belt does the moving, your cadence follows its speed, and you cannot simply slow down on a steep pitch by shortening your effort.
Outdoor grades are rarely what the sign says
Road signs list average grades over a stretch, and a steep ten-second pitch inside it can be far above that average. Phone apps estimate elevation from noisy data, so a route marked “8% average” may be both steeper in spots and flatter in others. Do not chase an exact match between a trail and a treadmill setting. Aim for a similar feel instead, and judge by effort.
Quirks that belong to the treadmill
Because the belt moves, you stay in one place relative to the room. That helps you monitor form in a mirror and keep a rail within reach. It also means heat builds quickly without airflow, so a fan matters more than people expect. Finally, treadmill grade changes arrive at the press of a button, while hills arrive gradually. Sudden jumps in grade are a treadmill-only hazard, and they are the reason we advise small steps.
Plain verdict
Use outdoor hills and treadmill grades as cousins, not twins. They share the math, but the feel differs, so judge by how you breathe and move, and log what you did instead of trying to “convert” sessions. That is the practical line any treadmill incline guide can draw.
How incline and speed work together
Incline never acts alone. Every grade you pick is paired with a speed, and the pair decides how the session feels. Many people treat the two as separate dials and push both up at once. That is how a pleasant walk turns into a sweaty argument with the handrails, and a treadmill incline guide that ignored speed would be half a guide.
Reading the feel map
The map above is an illustration, not data. Each circle shades from easy to very hard as speed and grade rise together. Notice two things. First, grade shifts the colors a lot even at walking speeds. Second, the ringed pair shows that a slow walk on a steep grade can feel about as demanding as a flat jog. That is the whole logic of incline walking: you can raise effort without raising speed.
Trade speed for grade, one at a time
Most people who raise the grade need to lower the speed, at least at first. A brisk 3.5 mph on the flat often becomes 2.5 to 3 mph at 8% to 10%, though your numbers will differ. Slowing down is not a failure. It keeps your steps full-length, your hands free and your breathing under control.
A good habit is to change one variable per adjustment. Raise the grade by a step, hold the speed, and see how it feels for a minute. If you still feel steady, stay. If you start gripping the rails, drop back a step. Runners follow a similar logic in the running treadmill guide, where grade is a hill-training tool rather than a pace crutch.
What happens to your stride
As grade rises, steps shorten and cadence tends to rise a little. Your foot lands closer to your body, and your heel may not reach the belt at all on the steepest settings. Those are natural adjustments, not flaws. Trouble appears when you fight them by reaching forward for a longer step, because reaching is how heels catch and knees complain.
Where you will probably feel it
People commonly report the work shifting toward the calves, hamstrings and glutes on an incline, and the front of the shins getting a rest compared with fast flat running. Breathing also steps up sooner than expected. These are general patterns, not a promise about any one body. If something hurts sharply, stop, lower the grade and get advice.
How treadmill inclines differ from machine to machine
Two machines can both advertise “incline” and behave nothing alike. If you are shopping, the buying-focused best incline treadmill guide covers which types of models earn a place. Here, this treadmill incline guide stays on how the incline itself differs, because those differences decide whether you will use it.
Range: how high, and how low
Typical home treadmills in the US market top out somewhere around 10% to 15%. Some go higher, and a few specialist machines climb far steeper, but most walkers never need more than 12% or so. Lower-priced machines often offer a short range, or a few fixed positions. A small number of models also offer decline, commonly down to about negative 3% to negative 6%, which lets you imitate a downhill stretch.
Manual incline
Fixed positions or a crank
You set the angle by hand, often with two or three fixed positions. It is simple and cheap to own, but you must stop the belt to change it.
Motorized incline
Console-controlled lift
A lift motor raises and lowers the deck on command, often while you walk. It enables intervals and programs, and it adds a part that can wear.
With decline
Below zero too
The deck can tip slightly downhill. It supports hill-like variety, though many people never use it, and it is not needed for good incline training.
Increments: how finely you can tune
Machines step the incline in different sizes. Many use 0.5% steps, some use whole percents, and a few allow finer changes. A 0.5% step is the sweet spot for most people because you can nudge the effort without a lurch. Whole-percent steps are fine for walkers. A machine that only jumps by 3% at a time makes progression awkward, so check how you will be able to move through the range you plan to use.
Response speed: how long the deck takes to move
The lift motor does not move instantly. Raising from 0% to 15% commonly takes tens of seconds to a couple of minutes, depending on the machine. Slow response is annoying during intervals, because the deck is still climbing while your timer says “go.” Fast response feels crisp, but it can also deliver an abrupt change underfoot if you are not ready. Neither is automatically better. What matters is that you know how your machine behaves and plan around it.
Manual vs motorized: who should choose which
Where motorized wins
- Change grade without stopping the belt
- Programs, intervals and auto-adjust workouts
- Finer steps and a broader range
- Easy return to 0% before you step off
Where manual holds up
- Fewer parts to fail or service
- Usually costs less to buy
- Predictable, fixed angles you learn quickly
- No waiting for the deck to move
If you walk at one comfortable grade most days, manual is enough. If you like variety, intervals or programmed hills, a motorized system pays for itself in use. The broader cost and feature tradeoffs live in the full treadmill buying guide.
Your drive motor matters too
The belt motor and the lift motor are different parts, but they interact. Steep grades load the drive motor harder, especially for heavier users and faster speeds. A machine with a modest motor can handle gentle inclines for walking, yet struggle with long steep sessions. The treadmill motor guide explains continuous horsepower and why duty cycle matters on hills.
Programs and auto-adjust
Many motorized machines include hill programs that change the grade for you. These are handy, but read what they actually do before trusting them. A preset profile that jumps from 2% to 9% and back may be fine for one person and far too aggressive for another. Look for machines that let you edit a program or override it with a single press, and learn where the pause button lives. Any treadmill incline guide worth reading should warn you about presets.
Reading the console and trusting the numbers
The console is the only window you have into what the deck is doing, so it pays to know what it says and what it leaves out. Treat the displayed incline as a reasonable estimate, not a lab reading. That attitude will save you from a lot of pointless comparison and a little frustration. Any treadmill incline guide should say it plainly: the console is an estimate.
Target versus actual
Many consoles show the incline you asked for, not where the deck currently sits. Press up to 8% and the display may read 8% while the lift is still climbing. A minute later it catches up. If you step off or change your pace in the middle, the number and the deck disagree. The habit that fixes this is simple: change the setting, wait until the sound of the lift motor stops, then judge the feel.
Calibration and accuracy caveats
Incline readouts come from a sensor in the lift system, and sensors drift. A machine that reads 0% may sit slightly above or below true level, and the error can grow across the range. Most owners never notice because they compare the console with itself. You may notice if you swap between two machines and one “feels” steeper at the same number.
Some manuals describe a calibration routine, often a button sequence that sends the deck to its limits and re-learns them. If yours has one, use it as the manual says, usually after assembly, after a move or when the display seems off. For a rough check, set the machine to 0% and rest a level on the belt, with the machine unplugged or the belt stopped. A few degrees of error is not a crisis, but a clear lean suggests a leveling problem or sensor drift.
Honest limits
Neither console numbers nor phone apps measure true grade precisely. Use them for consistency from day to day, and use effort, breathing and form as the final judge. If a machine’s incline seems wrong, contact the manufacturer’s support rather than guessing at repairs.
The other numbers on screen
Speed is usually reliable. Distance and time follow from it. Calorie estimates, by contrast, depend on assumptions the console cannot know about your body, so treat them as rough and do not plan around them. Heart-rate readings from grip sensors can jump around, and chest straps tend to be steadier. None of these should push you to a harder grade than you can hold with good form.
Quick keys and shortcuts
Quick keys that jump to preset grades save time, and they invite trouble. Hitting “12” from a flat walk gives the deck a long way to travel and you very little time to adjust. Use them in the cool-down direction, as a fast way back to 0%, and step upward with small taps. Another useful habit is to learn where the stop and the incline-down keys sit without looking.
Using incline safely: posture, rails and stopping
An incline raises effort and also raises the cost of a mistake. A tilted deck means a stumble carries you backward faster, and a belt that keeps moving does not wait for your feet to catch up. The safety points in this treadmill incline guide are cheap, and they take seconds to build into your routine. For recalls and safety notices on exercise equipment, the Consumer Product Safety Commission keeps the official list.
Posture that holds up on a steep grade
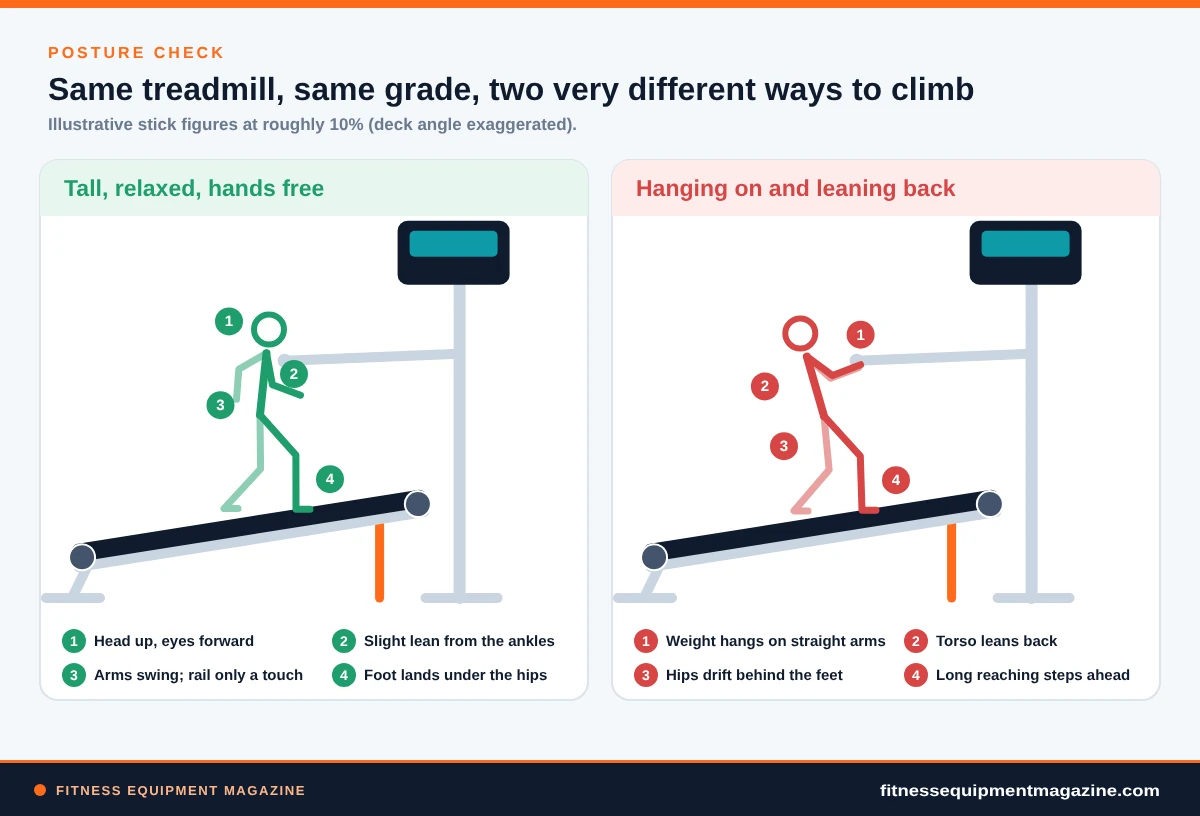
Stand tall, with your head up and eyes forward, and lean very slightly from the ankles, not from the waist. Let your arms swing the way they do on a sidewalk. Land your foot beneath your hips instead of reaching ahead. If you need to touch a rail for balance, use one or two fingers, not a death grip. The picture above shows the difference clearly: the free walker stays balanced, and the rail-hanger puts weight on straight arms.
Rails: a safety feature, not a crutch
Handrails are there for balance, stepping on and off, and recovery from a wobble. Using them to carry your weight at 10% changes what you are training. You lean back, shorten your stride, offload the legs and hand the work to your shoulders. It also feels easier, which is exactly why people do it. If you must hold on to hold the grade, the grade is too high or the speed too fast. Lower one of them.
Starting, changing and stopping
- Clip the safety keyAttach it to your waistband or shirt before the belt moves, and test that it stops the belt once while you are standing beside it.
- Start flatBegin at 0% or your usual low grade, and let the belt reach a comfortable speed before you add incline.
- Step up in small tapsRaise the grade one step at a time, wait for the deck to arrive, then check your posture and breathing.
- Lower before you finishBring the grade down gradually during the last few minutes, and return to 0% or close to it before you stop.
- Stop, then step offLet the belt come to a full stop. Stand on the side rails if there are any, and step off facing forward.
Safety
Never step onto or off a moving belt, and never let a child, pet or loose cord near the lift or the belt. If the deck moves unexpectedly, makes a grinding sound or stops short of where it should be, press stop, power down and contact the manufacturer. Do not keep using a machine you suspect is faulty.
Shoes and clothing
Choose shoes with a flexible forefoot, a stable heel and good grip. Walking shoes with firm cushioning are fine, and so are running shoes. Make sure they are tied securely. Loose laces and long drawstrings find their way into belts. On steeper grades, heel slip can irritate your feet, so a snug heel counter helps. Avoid thick socks that bunch and old shoes with worn-out soles.
When to check with a professional
General activity guidance for US adults appears in the HHS Physical Activity Guidelines, which describe broad weekly movement targets and encourage building up gradually. They do not tell you how to use an incline, and nothing in this treadmill incline guide replaces personal advice. If you have heart, joint, balance or other health concerns, or if you are returning after a break, ask a clinician or qualified exercise professional how steep and how long suits you.
Ceiling clearance and room setup for incline
A treadmill incline guide that skips the room is missing the most common surprise. Raising the deck raises you. At 15% the front of a typical 60-inch deck sits about 9 inches higher than at 0%, and your head goes with it. In a garage that rarely matters. In a basement with a low ceiling or an 8-foot apartment room, it can decide whether steep grades are usable at all.
The clearance math, with an example
Add four numbers: your height, the deck’s height off the floor, the extra lift at the grade you want, and a safety margin. A walker who is 6 feet tall (72 inches) on a deck that sits about 8 inches off the floor gets 80 inches at 0%. At 15%, add roughly 9 inches for the lift and you reach 89 inches. An 8-foot ceiling measures 96 inches, which leaves only about 7 inches. Arm swing, a stride bounce and a sprinkler head or light fixture shrink that further.
Those figures are illustrative, because deck heights and lift geometry differ by machine. Still, the habit is the point: measure your own ceiling, check the manufacturer’s stated clearance guidance, and leave a comfortable gap above your head at the steepest setting you plan to use. If the gap is tight, plan on lower grades and treat the top of the range as unused.
Floor, fan and the space around you
Steeper grades shift weight forward, so a stable, level floor matters more. Keep clear space behind the belt in case you step back, and keep the front area free of clutter. A fan helps because climbing generates heat quickly and the machine gives you no breeze. If you are working with a small footprint, the small-space treadmill guide covers folding and footprint tradeoffs that interact with incline travel.
- Measure the ceiling at the spot where your head will be at the steepest grade
- Keep two to three feet of clear floor behind the belt
- Place a fan to the side, not in front where it might distract you
- Keep lights and low fixtures out of reach of arm swing
Common incline mistakes: the treadmill incline guide checklist
Most incline problems fall into a handful of repeat offenders. None of them is dramatic on its own. They tend to stack, though: too steep, too soon, too fast, with hands on the rails, and a sore week to follow. Here is a checklist version of this treadmill incline guide’s main warnings.
- Holding the rails to carry the grade. Fix it by lowering the grade or the speed until your arms swing freely.
- Jumping to a steep grade in the first week. Fix it by adding about a percent per week or per couple of sessions, as comfort allows.
- Raising grade and speed together. Fix it by changing one variable at a time, and trading speed for grade as the climb steepens.
- Leaning back to “stay upright.” Fix it by standing tall with a slight ankle lean, and shortening your steps.
- Reaching for long strides. Fix it by letting steps shorten and cadence rise naturally.
- Stopping the belt on a steep grade and stepping off. Fix it by lowering the grade in the last minutes of a session, then stopping.
- Believing the console is a precision tool. Fix it by comparing the machine with itself and trusting effort over digits.
Too steep, too soon
Enthusiasm is the usual culprit. You see a 12% setting in a video, you try it, and the next two days your calves remind you. The body adapts to new loads, but it prefers a gentle ramp. Moving up a percent or so at a time, and giving each step several sessions, takes the sting out. Nothing about this is dramatic. It is simply how new loads feel when they arrive slowly.
Doing everything in one session
Another trap is the “big day”: fast pace, steep grade, long time. Change one lever and hold the others steady. If you want a longer session, keep the grade moderate. If you want a steeper session, shorten it. Mixing all three in one workout makes it hard to tell what helped and what hurt.
Ignoring the easy days
Steep grades load the calves and Achilles area differently from flat walking. Plan easy days between harder sessions, and use the flat or low-grade settings on purpose. Easy is not wasted. It is the setting that keeps you coming back next week.
Incline session structures: treadmill incline guide examples
People ask for “the best incline workout,” and no single answer exists. This treadmill incline guide offers common shapes people use, offered as examples to adapt, not plans to follow. They are not medical advice or a training prescription, and the numbers are placeholders for your own comfortable range. For broader weekly activity guidance, see the federal physical activity guidelines.
Steady grade
The simplest approach is to pick a comfortable grade, such as 3% to 5%, and hold it at a pace where you can still talk. It suits walkers, and it is easy to repeat. The value is consistency. You learn the feel, then add small changes over time, using the progression idea in the figure above.
Rolling hills
Alternate between a low grade and a moderate one every few minutes, for example 2% and 6%. The change in effort breaks up the session and imitates a rolling route. Because the machine does the changing, you can stay focused on form. Choose settings that let you keep your hands free through the highs.
Pyramid
Raise the grade a step every couple of minutes to a chosen peak, then come back down the same way. A pyramid builds a clear arc into the session and makes the cool-down automatic. It also protects you from jumping to your top grade too quickly, since you spend time at each step along the way.
Short intervals
Spend a minute or two at a steeper grade, then recover at a gentle one for longer. Many runners use this as a stand-in for hill repeats. Recover by lowering the grade, not by gripping the rails. With a slow-moving lift motor, allow time for the deck to travel, or you will lose half the interval waiting.
A word on viral formats
Formats such as the popular “12-3-30” routine, which pairs a 12% grade with a 3 mph pace for half an hour, spread through social media because they are easy to remember. They are one person’s structure, not a standard. If you try something like it, arrive there in steps over weeks, keep your hands free and stop if form falls apart. The general rule of thumb in this treadmill incline guide is the same everywhere: earn each grade before you spend long at it.
Keep a simple log
Write down three things after each session: the grade you held, the speed, and how it felt on a plain one-to-five scale. After a few weeks the log shows you what you can hold without gripping the rails. It also shows the week your plan got ahead of you. A notes app is enough, and so is a card taped to the wall. A treadmill incline guide cannot know your numbers, but your log can.
Walkers and runners use incline differently
Walkers tend to use grade to add effort without adding speed, because walking pace has a natural ceiling. Runners tend to use it for short bursts, hill-style work, and as a gentle change of load. If you are choosing a machine for running with hills in mind, the overview of the best treadmills for home use, linked in the conclusion, shows how incline fits with the other specs that matter.
Five treadmill incline myths, checked
Some ideas travel faster than the facts behind them. This short list, written for readers of this treadmill incline guide, sorts the common ones.
Myth
“You need 15% for it to count.”
No. Steady 3% to 6% sessions are legitimate, repeatable and kinder to your form. Steeper is simply different, not automatically better.
Myth
“Holding on is just safer.”
Rails are for balance. Hanging your weight on them at a steep grade changes your posture and can make a stumble more likely, not less.
Myth
“The console number is exact.”
It is an estimate from a sensor that can drift. Use it for consistency, and let effort and form do the judging.
Myth
“Slow on a hill is cheating.”
Slowing down is how the grade works. A slower pace at a steeper setting keeps your steps whole and your hands free.
Myth
“1% is a magic setting.”
It is a rule of thumb for faster running, where wind resistance matters. For walkers it hardly registers.
Treadmill incline guide maintenance: what to check and when
The lift system is one more mechanical assembly, and like the belt and motor, it lasts longer when someone looks at it. Steep grades and frequent changes ask more of it. You do not need tools or technical knowledge for the routine checks, only a manual and a few minutes every month or so.
Monthly checks that cost nothing
- Run the full rangeWith nobody on the belt, raise the deck to its top setting and lower it to 0%. Listen for grinding, clicking or a stall partway.
- Compare the display with the deckLook at the deck’s front edge at the top setting. If the console says 15% and the lift looks barely raised, note it.
- Check the floor and the feetMake sure the frame sits level and does not rock. An unlevel base throws off both feel and sensor readings.
- Inspect cables and coversUnplug the machine, then look for pinched wires, loose covers and dust build-up near the lift area.
- Wipe, do not sprayClean dust with a dry or slightly damp cloth. Keep liquids away from the motor area and the console.
Lubrication and the lift screw
Some lift mechanisms use a screw or actuator that the manual says to lubricate, while others are sealed and need nothing. Follow your manual to the letter. Using the wrong product or adding grease to a sealed part can attract dust and cause trouble. If the manual does not mention it, do not improvise.
Red flags worth acting on
- The deck rises unevenly, with one side higher than the other
- A grinding or squealing sound during incline changes
- Error codes mentioning incline or calibration that return after a restart
- The deck drifts down or up on its own during a session
- A burning smell, smoke or visible damage to wiring
Stop if
You see smoke, smell burning plastic or notice the deck moving by itself. Power the machine off at the wall, keep clear of the lift area and contact the manufacturer. For known hazards on exercise equipment, check the recall listings linked in the sources below.
When to call support
Calibration errors, noisy lifts and drifting readings often fall under warranty, but terms differ, and the lift motor may carry a shorter period than the frame. Keep your receipt, note the serial number and describe the symptom plainly when you call. A video of the problem helps. The terms and the questions to ask before purchase are laid out in the buying guide linked in the conclusion.
Which incline setup fits you? A treadmill incline guide in four hypothetical profiles
The profiles below, part of this treadmill incline guide, are invented to show how the ideas fit together. They are not real people or case studies, and none of them is medical advice. Match the pattern, not the person.
The steady walker in a small apartment
This person walks 30 to 40 minutes most days and wants a touch more effort without speeding up. A modest motorized range to about 10% is plenty, with half-percent steps if possible. They will live between 2% and 6% and rarely touch the rest. A quiet lift motor matters more than a huge range. The best incline treadmill page, linked below, covers the features that fit this profile.
The runner who wants indoor hills
Here the range and response speed matter. A machine that reaches 12% to 15% and climbs without a long lag suits interval work. The drive motor has to keep up with steep grades at running speed, so check its continuous rating and duty cycle. The runner’s main risk is jumping the grade too quickly, so progression habits matter more than any spec.
The returning exerciser
Someone coming back after a long break benefits from gentle grades, steady progress and generous recovery. A machine with sturdy rails, a clear safety key and a gentle, controllable lift is a better fit than a maximum-range model. They would be wise to confirm their plan with a qualified professional before building intensity.
The tall walker with a long stride
Taller people often need a longer deck to keep their stride comfortable, and the incline interacts with that. A short deck at a steep grade leaves little room for error behind you. Deck length is a separate topic, but it deserves a look when incline is a priority, and the best incline treadmill list explains the pairing.
Decision rule
If you will use fewer than three different grades, manual may be enough. If you want intervals, programs or hands-free changes, choose motorized. If you are heavier, taller or planning steep running work, give the drive motor and deck as much attention as the lift range.
Treadmill incline guide FAQ
Basics and feel
What does 1% incline mean on a treadmill?
It means the deck rises 1 foot for every 100 feet of belt travel, or about half a degree. Most people cannot feel it when walking. Runners sometimes use 1% as a default to offset the lack of wind indoors, but walkers rarely need it. If you are following a treadmill incline guide, treat 1% as a baseline label, not a hill.
Is 5% a good treadmill incline for walking?
For many people, yes. A grade between 3% and 6% is the range this treadmill incline guide treats as the everyday sweet spot. It adds noticeable effort without wrecking posture, and most walkers can hold it for a long session at a conversational pace. It is also easy to raise or lower in small steps as your comfort changes. Start lower if you are new to incline, and let your breathing and form decide when to step up.
How does treadmill incline compare with walking uphill outside?
The lifting work is similar at the same speed and grade, but the experience differs. Outdoors you meet wind, uneven ground and downhill relief. On a treadmill the grade stays constant until you change it, the surface is predictable and there is no breeze. So, as this treadmill incline guide explains, the same percent can feel harder indoors for a long climb, and easier for a short, controlled one.
Using incline well
Should I hold the handrails when I use incline?
This treadmill incline guide says: use them for balance and for stepping on or off, not to carry your weight. Gripping tightly at 10% shifts the work to your arms and changes your posture, which defeats the purpose and can strain your back. If you cannot let go, lower the grade or the speed until your arms can swing. A fingertip touch for reassurance is fine.
How fast should I walk on a steep incline?
Slower than you would on the flat. Many people drop a full mile per hour or more when they go from 0% to 8% or 10%. There is no ideal number in any treadmill incline guide, because stride, height and fitness all matter. Pick a speed that lets you keep full steps, free hands and steady breathing, and then adjust grade or pace by one step at a time.
The machine itself
Is a manual incline treadmill good enough?
It can be, and this treadmill incline guide would not talk you out of it, particularly if you use one or two comfortable grades most days. Manual systems have fewer parts to fail and usually cost less. The tradeoff is that you must stop the belt to change them, and you get fewer steps. If you want intervals, hill programs or hands-free changes, a motorized system is more practical. Our treadmill buying guide compares both approaches.
Why does my treadmill’s incline not match what I expect?
As this treadmill incline guide covers, consoles often show the target, not the actual deck position, and sensors can drift over time. A machine that is not level on the floor, or one that needs recalibration, can also read oddly. Check your manual for a calibration routine and make sure the frame is level. If the numbers still seem wrong, contact support. Avoid comparing your machine’s number to other machines.
How often should I check the incline system?
A quick monthly check, as in our treadmill incline guide maintenance section, is enough for most home users: run the deck through its full range, listen for odd sounds, look for pinched wires and confirm the frame is level. Do it sooner if you have moved the machine, or if the console shows an incline or calibration error. Follow the manual for lubrication, and check CPSC recall notices from time to time.
Getting started
Where should I start if I have never used incline?
Start with this treadmill incline guide’s gentlest rung: 1% to 2% at your normal walking pace, for a few minutes inside an ordinary session. Add a percent after a few comfortable sessions, and slow down if your hands drift toward the rails. Keep the safety key clipped on. If anything hurts or feels off, lower the grade and stop. Give yourself weeks, not days, to reach the middle of the range.
Conclusion: putting this treadmill incline guide to work
If you remember only a little from this treadmill incline guide, keep these three habits. Respect the percent, because small numbers do real work. Move up in small steps and let speed fall as grade rises. Keep your hands off the rails unless you truly need them for balance. Everything else is detail, and the details are mostly about knowing your machine and checking it now and then.
Your next steps depend on where you are. Use your own console for a week at a low grade and learn how it behaves, including the lag and the step size. If you are shopping, put your own range, step size and response needs on paper before you compare models. The best incline treadmill page and the main buying guide take that further, and the home-use cornerstone shows how incline fits among the other specs.
Sources and further reading
- HHS Physical Activity Guidelines for Americans — federal context on weekly activity and building up gradually.
- CPSC: Exercise equipment recalls — official recall and safety notices; check before buying or reusing a machine.
Editorial note: this treadmill incline guide is research-based guidance, not hands-on testing, and it is not medical advice. Some links on this site may be affiliate links. If you buy through them we may earn a commission at no extra cost to you, and recommendations are based on the criteria in the article, not payout. Last reviewed: October 2026.