A good cable machine buying guide starts with a small, slightly annoying fact: two machines can look almost identical in photos and feel completely different on the first rep. The difference hides in the pulley ratio, the weight stack, the way the carriages slide and how much floor the thing swallows. Get those four right and the rest is trim.
Picture the shopper this cable machine buying guide is written for. You’ve got a rack, a bench and a pile of plates, and you keep running into the same wall. Lat pulldowns are awkward with a band. Triceps pushdowns are a guessing game. Face pulls with a loose cable never feel right. A cable machine fixes all of that, which is why the category keeps growing in home gyms.
It’s also a category with a lot of confusing numbers. Stack weights, “2:1 ratios,” travel distances and footprints get thrown around in listings as if everyone already knows what they mean. They don’t. This cable machine buying guide translates each one into what you’ll actually feel, and into what you’ll need to measure before you click buy.
A smart cable machine buying guide starts with the pulley ratio. Choose by the ratio first, because it decides how much weight reaches your hand and how long the cable travels. Then check the stack (size, increments and guide rods), the adjustability (how many carriage heights and how smoothly they move) and the footprint, including ceiling height. The cable, pulleys and warranty round out the decision.
- Who it fits: lifters who already own the basics (a rack, a bench, some weights) and want pulldowns, rows, pushdowns, flyes and face pulls without a stack of bands and anchors.
- The biggest tradeoff: a dual-stack machine with adjustable carriages is far more versatile, but it needs real floor space and a ceiling that clears the frame. A single-stack tower or rack attachment is smaller and simpler, with fewer exercises.
- The common trap: buying on the biggest stack number. A 200 lb stack with a 2:1 ratio delivers roughly 100 lb at the handle, so check what you’ll really get.
If you’re still deciding between a cable machine and other strength gear, start with our guide to the best home gym equipment for strength training and what to buy first.
How we researched this. This is research-based guidance built from manufacturer specification patterns, federal activity guidance and ownership problems that buyers commonly report. We haven’t hands-tested the machines described here, so you won’t find measured loads, decibel readings or “our testers” claims. We name no brands and quote no prices for specific products. Figures below are typical ranges, so verify them against the current spec sheet. Last reviewed: October 2026.
Specs, warranties, availability and recalls shift every few months. Treat the numbers here as typical patterns, not quotes. Before buying anything, read the current spec sheet and warranty page. Then check the CPSC exercise equipment recall list for the model you’re considering.
What a Cable Machine Buying Guide Should Settle First
Before any spec, every cable machine buying guide should ask a simpler question: what do you want the machine to replace? Some people want a lat pulldown station. Others want a full functional trainer with two arms that move up and down and let them do cable crossovers, woodchops and single-arm presses. Those are different purchases, and they sit at very different points on the space and cost scale.
What a cable machine buying guide assumes you know: how the machine works
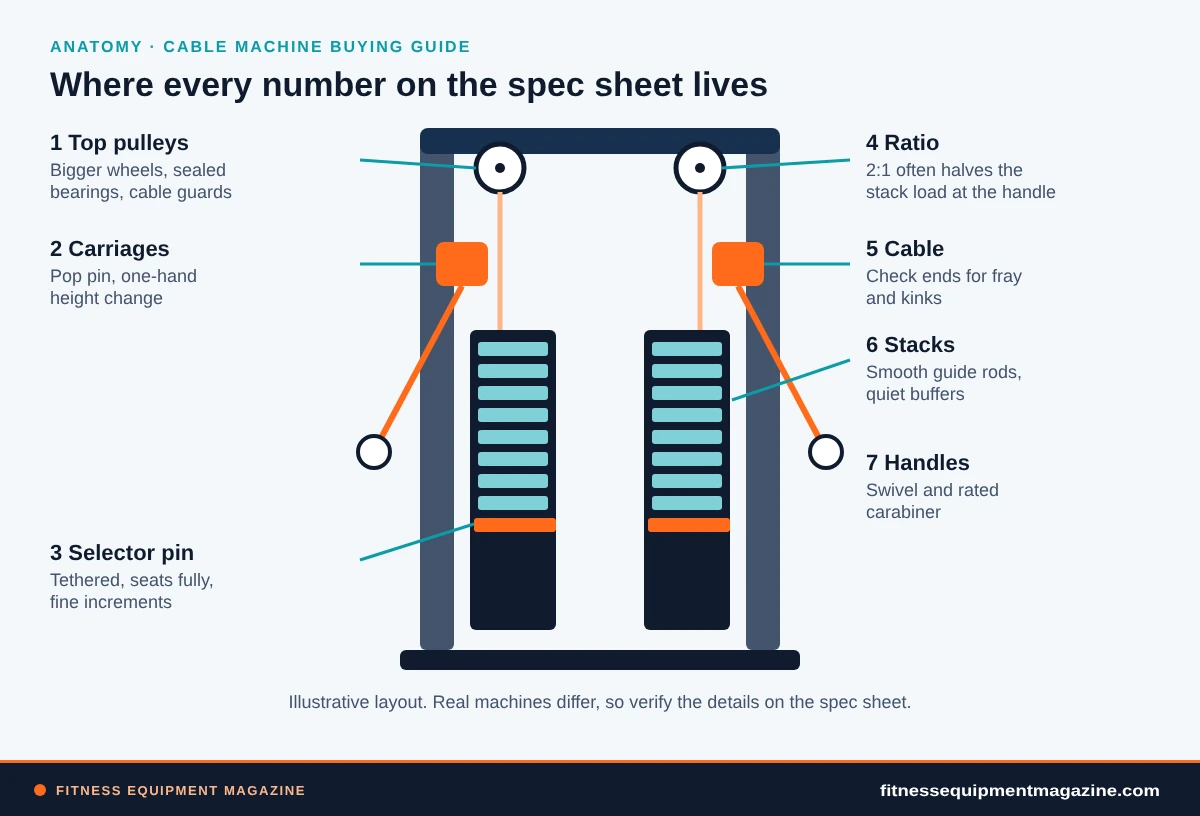
A cable machine turns a stack of weight into a pull you can aim. Inside, a cable runs from a handle up through one or more pulleys, over to a carriage and down to a weight stack. When you pull, the stack lifts. When you let go, gravity brings it back down. The direction of your pull isn’t tied to the direction the weight moves, and that’s the whole point.
Free weights always pull straight down. Cables pull wherever you aim the pulley. So a cable lets you train a muscle through a path where a dumbbell would drop out of the load. The tension also stays fairly steady through the rep, which many lifters find friendlier on joints than a barbell at the same weight. Fair warning, though: “friendlier” is a feeling, not a medical promise, and we won’t make one.
What it won’t do
A cable machine won’t replace squats, deadlifts or heavy presses. The loads are usually too low and the stability demands are different. It also isn’t a magic fix for a cramped room. If you want a broader view of how cables fit with racks, benches and weights, our strength-equipment priority guide lays out the order we’d buy things in.
Before you open a single listing, note the exercises you want most (say, pulldowns, rows and pushdowns), the number of people sharing the machine, and the width, depth and ceiling height of your space. Those three answers eliminate half the market. This cable machine buying guide will keep pointing back to them.
The three families you’ll meet
Almost every product in a cable machine buying guide falls into one of three families. Knowing which you’re looking at saves hours.
Selectorized stack machines
A weight stack with a pin you move to pick the load. Fast to change, tidy and quiet. This family includes single-stack towers and dual-stack functional trainers.
Plate-loaded cable machines
You load standard plates onto a post or sleeve. Cheaper to build, and the weight range is whatever plates you own. Changing load takes longer.
Rack attachments
Pulley systems that bolt onto a power rack and use your plates. Smallest footprint, most compromises. See our power rack guide for compatibility.
Each family can be excellent. The mistake is buying one while expecting another’s behavior, such as a plate-loaded attachment that’s supposed to change weight in two seconds, or a compact tower that’s supposed to do crossovers.
Cable Machine Buying Guide to Pulley Ratios: 1:1, 2:1 and What Reaches Your Hand
The pulley ratio is the single most misunderstood number in any cable machine buying guide, and listings rarely explain it. Here’s the plain version. The ratio compares how far your hand moves with how far the stack moves, and, in the opposite direction, how much weight your hand feels compared with the stack.
How the ratio works
With a 1:1 ratio, the cable runs straight over fixed pulleys. Pull the handle one foot and the stack rises one foot. Whatever the stack says is, in theory, what you feel. With a 2:1 ratio, a moving pulley sits in the loop. Pull the handle two feet and the stack rises one foot, so the load at your hand is about half the stack number. Many home functional trainers use 2:1 for exactly that reason.
What the ratio changes in daily use
A 2:1 machine feels smoother for light and moderate isolation work because friction matters less when the load at your hand is small. It also lets a modest stack cover small movements such as lateral raises and face pulls with finer steps. The cost is longer cable travel, so you’ll need a stack tall enough to hold the stroke and a frame high enough to keep the handle path clear.
A 1:1 machine suits heavy pulldowns and rows, where you want the stack number to mean what it says. Commercial lat towers often work this way. In a home, 1:1 stacks get tall or heavy quickly, so they appear mostly in towers and plate-loaded designs. That said, many dual-stack trainers publish a stack weight and a ratio, and a lot of buyers read only the first.
Divide the stated stack weight by the ratio’s first number to estimate the handle load. A 200 lb stack at 2:1 is roughly 100 lb at the handle; at 1:1 it’s closer to 200 lb. Neither is wrong. They suit different goals, and comparing stack numbers across ratios is like comparing miles to kilometers.
The questions to ask about any ratio
- Is the ratio the same for every attachment point? Some machines use 2:1 on the adjustable arms and 1:1 on a fixed low pulley or lat bar. Listings seldom say.
- What’s the handle-load range? Ask for the lightest and heaviest practical load at the handle, not only the stack plates.
- How long is the stroke? Taller people and long pulls such as pulldowns and straight-arm pressdowns need generous travel.
- Is the stack weight listed with or without the carriage? A moving carriage and pulley have a small weight of their own that subtracts from a very light setting.
If you’ve already looked at plate-loaded options and rack attachments, you’ll find the ratio math is the same. It just depends on how the pulleys are laid out. For the attachment side, our cable attachments guide covers what each handle and bar changes.
Cable Machine Buying Guide to Weight Stacks: Size, Increments and Selector Pins
The stack is the part everyone looks at, and it’s easy to misread. A stack is a column of flat plates threaded on two guide rods, with a hollow center rod and a pin that picks how many plates lift. Simple. The details are where most buying advice goes thin, so let’s slow down.
How big a stack does your cable machine buying guide shortlist need?
Stack sizes in home machines commonly run from roughly 100 lb to 200 lb per side, with some towers and commercial-style units going higher. Because of the ratio, those numbers shrink at the handle. For most home lifters doing rows, pulldowns, pushdowns and flyes, the practical handle range is lower than people expect. Isolation moves such as lateral raises sit in the single digits and low teens of pounds, while a strong lifter’s pulldown or row may use most of a stack.
So size the stack to your strongest exercise, then check the smallest step for your lightest one. If you plan to add an upper-body pulling day with heavy rows, favor a bigger stack or a 1:1 ratio. If you mostly want shoulder health work, face pulls and arm isolation, a smaller, finer-stepped stack with 2:1 leverage fits better.
Increments: the underrated spec
Increments describe how much the load changes per pin hole. Many stacks step in 10 lb plates, and good ones add a half-weight or a small add-on pin for 2.5 lb or 5 lb jumps. At a 2:1 ratio, that matters twice as much as it sounds, because a 10 lb plate step becomes only about 5 lb at the handle. That’s lovely for lateral raises.
On the other side, a stack with only big jumps feels clumsy on isolation work. Going from “too easy” to “too hard” in one pin move kills progress on the small muscle groups. If you don’t see the increment in the listing, treat that as a question for the seller rather than a safe assumption.
Guide rods, pins and the sound of a stack
In a cable machine buying guide, look at the guide rods first. They should be smooth, straight and sturdy, with bushings or bearings at each plate edge so the plates don’t rattle. A stack that clanks in a showroom video will be louder in your garage at 6 a.m. Some builders add rubber or polymer buffers on top of each plate or a top plate cap that quiets the return.
Then think about the pin. It should be tethered, since a loose pin ends up on the floor and under the bench. A magnetic or spring-loaded pin is easier to move mid-set, and a chunky pin handle is kinder to cold fingers. Also check how well the pin seats. A pin that sits half-in is a safety problem, because the stack can drop unexpectedly.
Selectorized or plate-loaded?
Selectorized stacks win on speed, tidiness and noise. You change loads in seconds, which matters in supersets and circuits. Plate-loaded cable machines win on price, simplicity and potential top-end load, but you will be loading and unloading plates, and that interrupts the flow of a session. If you already own a lot of plates and you train alone, plate-loaded can be a smart choice. If two people share the machine and swap weights constantly, a stack pays for itself in patience.
Selectorized stack strengths
- Changes load in a few seconds
- Quieter, with guided plates that stay put
- No plates to lift on and off after a long day
- Good for shared use and circuit training
Selectorized stack tradeoffs
- Heavy and bulky to move and assemble
- Top load is capped by the stack you buy
- Increments can be coarse on cheaper units
- Usually costs more than a plate-loaded equivalent
Cables, Pulleys and Bearings: The Parts That Wear
Everything in this cable machine buying guide so far is about how a machine behaves when it’s new. This section is about how it behaves in year three. Cables, pulleys and bearings carry the repeated load, and they’re where most of the real quality differences show up.
Cable construction and what to ask
Home cable machines most often use steel cable in a range commonly around 5 to 6 mm in diameter, frequently with a protective nylon coating. A coated cable runs a touch quieter, and the coating helps keep the strands from rubbing on the pulley edges. It also hides fraying until the damage is advanced, so inspect the ends and every bend point regularly.
Ask for the cable’s rated breaking strength compared with the maximum handle load. A wide safety margin is normal for good builders, and a seller who can’t answer is a warning flag by itself. Also ask whether replacement cables are sold and how they’re attached. If the cable is proprietary and discontinued after two years, you’ve bought a very heavy decoration.
Pulleys: diameter, material and bearings
Pulley wheels are commonly made from nylon, aluminum or a composite. The diameter matters more than people think. Bigger wheels (often around 4 to 5 inches) bend the cable less sharply, which cuts wear and friction. Small, thin pulleys cost less but chew cables and can spin rough. A sealed bearing inside the pulley means the wheel keeps spinning smoothly without regular oiling.
Pulley guards are the unsung safety feature. A guard is a small plate or bracket that keeps the cable seated in the groove if it ever goes slack. Without one, a cable can hop off and wedge between the wheel and the frame. That’s a bad afternoon, and it’s what happens when a cable slackens at the top of a rep and snaps taut. Look for guards on every pulley, especially the ones on swiveling arms.
Carriages, swivels and the little hardware
On adjustable machines the carriage slides on a track. The best designs use bushings, bearings or a roller system and a clear locking pin, so the carriage moves with one hand and locks without wiggle. Cheaper machines use plain sliding blocks that grind and stick over time. Test the carriage in a store if you can, or look for reviewer patterns about sticking and lock slop.
At the end of every cable are a swivel and a carabiner or quick-link. These small parts carry the load, so look for rated hardware with a threaded or screw gate rather than a light spring clip. A swivel stops the cable from twisting under angled pulls and extends its life. If your attachments don’t fit the clip, you’ll replace the clip, and that’s fine, but know it before you order.
Run your fingers along the cable end to end with the stack at rest, looking for broken strands or kinks. Check the pin and the top plate for wobble. If anything looks frayed, bent or loose, stop using the machine and replace the part. Never repair a cable with tape or an improvised clamp.
Adjustability and Travel: Height, Reach and Angles
This is where cable machines earn their reputation in any cable machine buying guide, and where the price spread opens up. Adjustability is the range of positions your handle can start from, and it decides how many exercises the machine can do well. A fixed pulley does pulldowns and pushdowns. Two adjustable carriages can do almost everything.
How many heights, and how easy to change?
Look for the number of height positions and the spacing between them. Many functional trainers offer roughly 15 to 30 positions along the upright, often with about 2 to 3 inch spacing. A machine with only four or five holes may force awkward compromises on chest-height flyes and cable curls.
Equally important is the change mechanism. A spring-loaded pop pin is fast. A bolt-on bracket is slow, and you’ll avoid changing it mid-workout. Test with one hand, because with a cable in the other and a set in progress, a two-handed adjustment is a real barrier.
Travel, reach and the cable stroke
Cable travel is the length of pull available before the stack bottoms out or the cable runs out. A 2:1 machine often shows a long stroke at the handle, which is great for pulldowns and long rows. A shorter stroke clips the end of movements for taller lifters. If you’re over about six feet tall, compare travel numbers rather than relying on the photos.
Don’t forget reach. Adjustable arms that swing inward and outward let you do crossovers, single-arm work and angled pulls. Arms that only travel up and down are fine for most lifters, but they limit chest flyes and rotational work. Some arms pivot in two planes, which is lovely, but the extra joints add play and cost.
Single stack or dual stack?
A dual-stack machine gives each arm its own weight, so you can do independent, balanced movements. A single-stack machine usually runs everything off one stack, so you pick one load and use it for whichever handle you grab. Dual stacks are the better teachers for single-arm work and for balancing a weaker side. They also need more floor space, more assembly and more money, which is why plenty of buyers sensibly choose a single-stack tower.
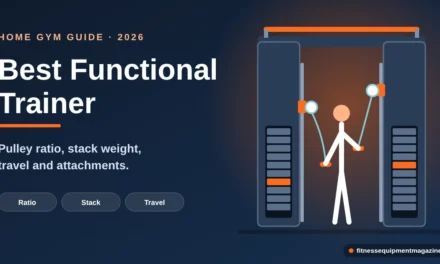
For a closer look at the dual-stack category, including stack weight and arm design, see our functional trainer guide. It focuses on that one machine type, while this cable machine buying guide covers every format. Think of that page as the deep dive and this cable machine buying guide as the map.
Cable Machine Buying Guide to Footprint, Ceiling Height and Floor: Will It Fit?
Here’s the part that quietly ruins good purchases. A cable machine’s listed dimensions describe the frame, but you use it with a bench, a pair of outstretched arms and a pulling path. The space around the machine is nearly as important as the machine. Any cable machine buying guide worth reading should make you grab a tape measure, so grab one now. Fit is the part of a cable machine buying guide that saves the most money.
Frame dimensions you’ll see
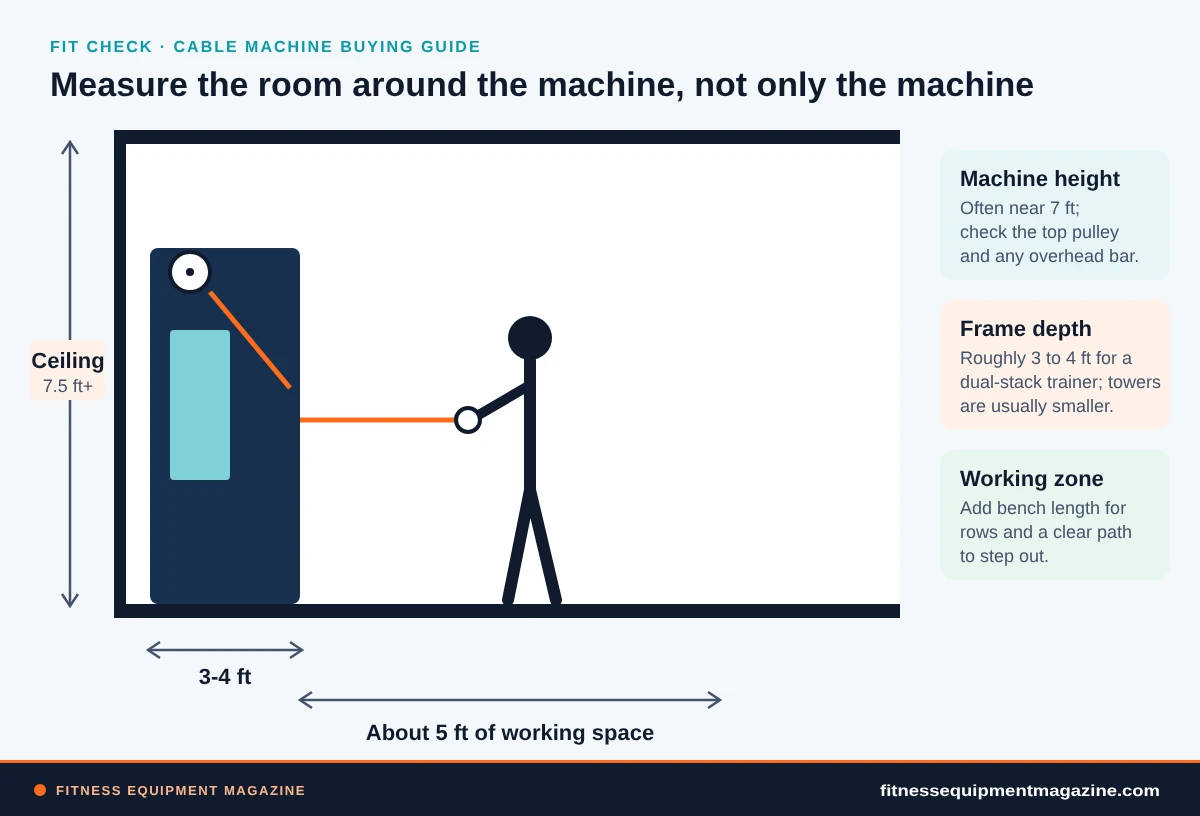
Commonly, a dual-stack functional trainer is somewhere around 4 to 4.5 feet wide and 3 to 4 feet deep, with a height in the neighborhood of 7 feet or a bit more. A single-stack tower is narrower, often around 2 to 3 feet on each side. Rack attachments add little footprint of their own, since they live inside your power rack. These are typical ranges only, so check the spec sheet for the machine you want.
Ceiling height is the quiet killer. Many tall frames need around 7.5 feet or more of clearance, and some designs with a top pulley sit even higher. Basements and older garages often have ducts, joists or low doorways that complicate delivery, so measure the path as well as the destination. Our ceiling height guide explains how to measure around beams and pull-up bars.
The working space you can’t see in the listing
Plan about two to three feet of clear space in front of the machine for a standing pull, more for crossovers where your arms sweep across. If you want to sit on a bench in front of it for rows, add the bench length. Allow for a walkway behind or beside, because your body needs to turn without hitting the frame or a wall. That’s why a 4 by 4 foot machine often ends up claiming a 7 by 9 foot area.
Floor, anchoring and weight
A selectorized machine commonly weighs several hundred pounds once the stack is loaded, and a dual-stack unit can weigh considerably more. On a ground-level slab that’s no problem. On an upper floor or a framed deck, it’s worth reading about weight distribution first, and our floor load basics guide is the place to start. Spread the load with a thick rubber mat or platform so feet don’t concentrate force on one spot.
Check whether the frame is meant to be bolted down. Tall towers can tip under pulling forces, particularly with a loaded stack and a quick, angled pull. Many manufacturers specify anchoring or a rear stabilizer, and you should follow the manual. If you rent or have a finished floor, ask about freestanding options with a wide base. A thick rubber mat is the usual starting point.
Cut cardboard or tape the floor to the machine’s footprint, then add the working zones from the plan above. Stand in it and pretend to do a crossover. If your elbows hit anything, the machine is too big. This takes twenty minutes and can save you a restocking fee.
Six Cable Machine Types and Who Each One Fits
The cable machine market looks like a jumble of names, which is why a cable machine buying guide sorts it by type, but six types cover almost everything. The real skill in a cable machine buying guide is matching a type to a person, so each description below ends with the buyer it suits and the point where it stops being the right choice.
Dual-stack functional trainer
Two adjustable arms, two stacks, usually 2:1. The most versatile option and the one most people picture. Best for lifters who want crossovers, single-arm work and many pulling angles. Needs the most floor space and budget.
Single-stack tower
One stack, one or two pulleys, often with a lat bar and a low row. Compact and easier to place. Best for pulldowns, rows and pushdowns with a modest exercise list.
Rack-mounted cable attachment
Pulleys that mount to a power rack and use plates. Smallest footprint if you own a rack. Best for people who already own plates. Slower load changes and a more limited arm range.
Wall-mounted or compact cable station
A slim bracket or panel that fixes to the wall. Almost no floor use. Good for tight spaces, though it asks for solid wall structure and a clear landing zone.
All-in-one home gym with cables
A multi-station frame with a stack that also includes a press, a leg developer and cable stations. Convenient and guided. Less adjustable than a dedicated trainer, and quality varies widely.
Plate-loaded cable crossover
A frame with two upright plate posts and cable runs. Heavy loads and tough builds, but plate changes take time and the footprint is large. Best for experienced lifters with lots of plates.
How the types in this cable machine buying guide differ in daily use
A dual-stack functional trainer is the closest thing to a one-machine answer. The price of that flexibility is bulk. If your room can host it comfortably, it’s often the right call. If it can’t, don’t talk yourself into it, because a machine you can’t walk around is a machine you’ll avoid.
A single-stack tower is a more modest idea executed well. You’ll do pulldowns, seated rows (with a bench), pushdowns and curls, and you’ll do them smoothly. That covers a lot of ground for a smaller footprint. For a hybrid, some towers let you swap in extra pulleys or attach a low row platform, and those add-ons are worth checking in the listing.
Rack attachments suit a very particular buyer: someone who already has a good rack and plates and doesn’t want a second big machine. If that’s you, confirm hole spacing, upright size and plate sleeve length before buying. Our power rack guide covers those compatibility questions, and our Smith machine vs power rack comparison helps if you’re also weighing guided-bar setups.
Four buyer profiles (hypothetical)
These are illustrative shoppers, not real people. They show how the same cable machine buying guide leads to different choices.
Has a rack, wants variety
Two-car garage, a spare bay, ceiling around 9 feet. Wants crossovers and single-arm work. A dual-stack trainer fits, with a mat and an anchor plan.
Small room, quiet needs
An 8-foot ceiling and a roommate downstairs. A compact single-stack tower with a rubber mat and polymer stack buffers is the practical call.
Owns lots of iron
Already has a rack and several hundred pounds of plates. A rack-mounted cable attachment adds pulldowns and rows without another big purchase.
Two people, different strength
Two lifters with a big gap in strength. A dual-stack with fine increments avoids constant plate swaps and keeps both people moving.
A Ten-Minute Decision Matrix for Any Cable Machine Buying Guide Shortlist
Matrices usually become tables. We’d rather give you a route. The flow below asks four questions in the order they eliminate the most options, and it ends at a machine type rather than a model name. Run through it once with your measurements in hand, then use the sections above to choose between finalists.
What the cable machine buying guide flow leaves out
No flow chart in a cable machine buying guide sees your budget, your lifting history or your patience for assembly. It also can’t know if the machine will go up a staircase. Keep those in mind as tie-breakers. If two types both fit, pick the one with the better warranty and clearer maintenance guidance.
And be honest about your training. If you lift three days a week and use cables on two of them, a tower is plenty. If cables are the center of your routine, a dual-stack is easier to love. Almost nobody regrets a machine they actually use, whatever the spec sheet says.
Cable Machine Buying Guide Price and Value Logic Without the Price Tags
This cable machine buying guide won’t quote prices for named machines, and you shouldn’t trust anyone who does without a date next to the number. What we can do is show you how to think about cost. Cable machines sit across a wide span, from rack attachments that cost a fraction of a full trainer to heavy dual-stack units that cost many times more. Your job is to work out which of those dollars buy something you’ll feel.
Where the money actually goes
When two machines differ a lot in cost, the gap usually lives in five places: steel gauge and frame stiffness, pulley and bearing quality, stack and guide-rod finish, adjustability mechanisms and the warranty behind it all. Brand marketing and screens add to the number, but they rarely add to the lifting. Bear that in mind when a listing leans on lifestyle photos instead of specifications.
The costs that arrive after checkout
Add the extras to your budget before you commit, a step every cable machine buying guide should include. A good rubber mat, a bench that works with the machine, a set of attachments and, in some cases, anchoring hardware all add up. Delivery matters too. Freight shipping on a heavy machine can come with a threshold, a curbside drop and a long wait, and some sellers charge for returns that need a pallet. Read the return policy before you pay, because returning a 300 lb box is a project in itself.
If you plan to buy a handful of cable attachments, check which come in the box. A basic package often has a lat bar, a short bar, a rope and single handles. Our attachments guide explains which extras are worth the money and which are filler.
What about used machines?
Used cable machines can be a bargain if you inspect them well. Ask for photos of the cable ends, the pulleys and the guide rods. Pull the cable by hand through the whole stroke, listen for grinding and look for rust on the rods. Check that replacement parts remain available for that model. Moving a used machine is also work, since you’re probably disassembling a heavy frame, so factor in a helper and a truck. A fair price on a worn-out unit is still a bad deal.
A slightly smaller machine from a builder with clear specs, spare parts and a long warranty usually beats a bigger one with vague details. You’ll get more years of smooth reps, and you’ll know who to call when a pulley eventually needs replacing.
Red Flags in Listings: A Cable Machine Buying Guide Filter
You can learn a lot from how a listing is written. A trustworthy seller shows the numbers that matter and doesn’t dodge the ones that don’t flatter the product. Use this cable machine buying guide list as a filter, and give each flag more weight if you see several together.
- No stated pulley ratio. If the listing shows stack weight but not the ratio, you can’t tell what reaches your hand. Ask, and take silence as a warning.
- Stack weight that’s “up to” something. Look for a clear number and how it breaks into plates and increments.
- Tiny pulleys with no mention of bearings. Cheap wheels wear cables and add friction at light loads.
- No pulley guards in the photos. Zoom in. Cables slip out of grooves more often than you’d think.
- No rated capacity for the cable or hardware. Serious builders publish it. Others hide behind vague phrases such as “commercial grade.”
- A warranty that excludes wear parts or lasts under a year. The frame should be covered longer than the cable, but the whole structure should be spelled out.
- Stock images only, with generic angles. You want to see the actual carriage, pin and stack, not a render.
- Reviews that mention the same recurring problem. Look for patterns such as sticking carriages, cable fraying or missing hardware, not a single angry post.
Marketing phrases worth translating
“Commercial grade” has no legal definition, so treat it as an invitation to ask for details. “Smooth motion” is a feeling, and it should be backed by the bearing and pulley information. “Infinite adjustability” usually means a lot of holes, which can be great, but ask how many and how far apart. “Space-saving” means smaller than something else, not small. Compare dimensions, not adjectives.
Recalls and safety checks
Before you buy, search the machine type and brand on the CPSC exercise equipment recall list. Recalls on strength gear often involve cable or hardware failures, tipping hazards or weak welds. A past recall isn’t automatically a reason to avoid a company, since a good response to a problem can be a good sign. What matters is whether the fix was clear and whether replacement parts were provided. Keep the model and serial number somewhere you can find them later.
Cable machines store a lot of energy in a loaded stack. Don’t let children climb or hang on the machine or play with the pin. Keep the area clear of pets and toys, and keep the stack lowered when you leave the room. If you’re returning from a long break or have a health concern, speak with a qualified professional before choosing loads.
Cable Machine Buying Guide Setup, Anchoring and Care
The machine arrives in boxes. What happens next decides how it feels for years, and a careless assembly is the quiet cause of many “bad machine” reviews. Plan for a helper, a free afternoon and space to lay out the parts.
Assembly that holds up
- Unpack and inventory.Lay out every part and compare it with the manual’s checklist before you start. A missing bolt found at step 20 is much worse than one found at step 1.
- Loose-fit first.Thread bolts by hand and leave them slightly loose until the frame is aligned. Tightening early can leave the uprights twisted.
- Route the cable carefully.Follow the manual’s diagram, keep it from twisting and make sure it sits in every pulley groove and under every guard.
- Square and tighten.Check that the uprights are plumb, then torque the fasteners to the manual’s specification in the sequence it suggests.
- Test unloaded, then lightly loaded.Move the carriage and handle through the full stroke at the lightest weight. Listen for rubbing and look for a cable that rides off-center.
- Anchor or stabilize.If the manual calls for anchoring, do it now. Otherwise add the recommended feet, plates or a base weight.
A realistic care schedule
Maintenance is dull and short. A quick routine every month or so keeps a good machine good. Wipe the guide rods with a clean cloth, and apply the lubricant the manual recommends, which is often a silicone or light machine oil rather than a thick grease. Skip anything sticky, because dust clings to it and gums up the bushings.
Check every bolt for tightness after the first few weeks, since fasteners often settle. Then check again each season. Look over the cable, the pulleys and the hardware for wear each time, and keep a spare cable end or carabiner on hand if the manufacturer sells them. For a full routine across bolts, cables and upholstery, see our strength equipment maintenance guide.
Photograph the serial number plate and the receipt, and file the manual. Warranty claims go faster when you can send a clear photo of the part and the date of purchase in the first message.
Noise, floor and household habits
A stack machine makes a distinctive clunk on the return. A thick mat under the base and polymer buffers on the guide rods tone it down, and lowering the stack gently instead of dropping it helps more than any accessory. If you share walls with neighbors or sleeping family members, avoid early mornings and late nights, and set the machine away from shared walls if you can. Mats, buffers and placement do most of the work.
A Cable Machine Buying Guide Shopping Routine That Works
You’ve read the specs. Now turn them into a process, the practical end of any cable machine buying guide. The goal of this cable machine buying guide routine is to end up with two or three finalists and a clear way to choose between them, rather than forty open browser tabs and a vague feeling of dread.
The cable machine buying guide routine in order
- Measure.Width, depth, ceiling height, doorways and stairs, plus the working zone from the floor plan above.
- Write your exercise list.Five to eight moves you’d genuinely use. This sets the adjustability you need.
- Run the decision flow.Land on a machine type, not a model.
- Build a shortlist of three.For each, record ratio, stack size, increments, number of carriage positions, cable and pulley details, footprint and warranty.
- Do the handle-load math.Convert stack weights to handle loads and compare the lightest and heaviest practical settings with your needs.
- Read reviews for patterns.Look for recurring comments about sticking carriages, noise and missing parts, and weigh them against the seller’s responses.
- Check recalls and policies.CPSC, the return policy, the freight terms and the warranty fine print.
- Decide, then plan delivery.Clear the space, line up a helper and keep the packaging until you’ve tested everything.
Questions from the cable machine buying guide worth asking a seller
- What is the pulley ratio on every attachment point? The answer should be specific.
- What are the stack increments, and is there an add-on weight option?
- What are the cable’s size and rated strength, and can I buy a replacement?
- Which parts does the warranty cover, and for how long? Ask about frame, cable, pulleys, stack and finish separately.
- What’s the shipped weight and what delivery service is used? Heavy items can arrive at the curb.
- What is the return process and who pays for it?
Five cable machine buying guide mistakes that cost the most
First, buying on stack weight and ignoring the ratio. Second, skipping the ceiling measurement. Third, ignoring the working zone, so the machine fits the room and the person doesn’t. Fourth, choosing a bargain machine with tiny pulleys and then replacing cables twice. Fifth, forgetting the extras, because a machine with no bench, no mat and no attachments is only half a gym.
None of these are dramatic. They’re all quiet, and each one stays with you for years, which is precisely why a cable machine buying guide can be worth reading even if the machine itself feels simple.
After the cable machine buying guide: the first month
Once the cable machine buying guide has done its job, go light for the first sessions. Learn the feel of the carriage, the pin and the cable path. Try each exercise on your list at a weight you can control, and make notes on which positions you used. After two or three weeks you’ll know if you want more attachments, a different bench or a mat upgrade. If something is wrong, contact the seller early while the return window and your memory are fresh.
For a wider view on building out the rest of your space around a cable machine, our home gym layout guide shows how clearances work around racks, benches and machines. Muscle-strengthening activity is part of general federal guidance as well. The HHS Physical Activity Guidelines describe weekly amounts for adults, and a cable machine is one practical way to do it at home. How much and how hard is a decision for you and a qualified professional.
Cable Machine Buying Guide Myths and Facts
Cable machines pick up folklore quickly, so we check the common claims, partly because gym culture likes strong opinions and partly because the mechanics are hard to see. Here are the claims we hear most, with a plain answer for each. Remember that none of this replaces the manufacturer’s own manual or a qualified coach.
Myth: a bigger stack means a stronger machine
A bigger stack means more plates in the column. It says nothing about frame stiffness, pulley quality or what lands in your hand. A well-built 150 lb stack at 1:1 can load you harder than a 250 lb stack at 2:1. Always convert to handle load before comparing, which is the first lesson of any good cable machine buying guide.
Myth: cable machines are always smoother than free weights
Cables feel smooth when the pulleys are good, the cable is clean and the carriage is aligned. A cheap machine with tiny pulleys and a dry carriage can feel notchy and sticky, particularly at light loads where friction is a larger share of the total. Smoothness is a build-quality outcome, not a property of the category.
Myth: a cable machine can replace your rack
It can’t, for the reasons we covered earlier. Heavy squats, deadlifts and presses need a rack, a bar and plates. A cable machine complements them by filling in the gaps: pulling from different angles, lighter isolation work, single-arm movements and anything that wants steady tension. The best home gyms often use both, and we explain how to prioritize in our strength equipment priority guide.
Myth: “commercial” means it will last forever
The word is a marketing term. Real commercial machines get serviced often, and their cables and pulleys are replaced on a schedule. A home machine used by one person three days a week is under far less stress, so a well-made residential unit can be perfectly good. What matters is the quality of the parts and whether you can get replacements, not the label on the box.
Myth: assembly is just bolting things together
Cable routing, bolt sequence and frame alignment all affect how the machine feels. A pulley a few millimeters out of line can chew a cable and add friction on every rep. Take the time to follow the manual’s order, and recheck the alignment after the first couple of weeks of use.
If you’re ever unsure whether a machine is safe to use, stop. Check the manual, contact the seller and, if necessary, have a qualified technician look at it. A delayed workout costs far less than a failed cable.
Cable Machine Buying Guide FAQ: Questions Buyers Ask
What should a cable machine buying guide cover first?
A useful cable machine buying guide starts with fit and the pulley ratio. Measure your space, including ceiling height and the working zone around the machine, then check the ratio to learn what weight actually reaches your hand. After that, compare stack size and increments, adjustability, cable and pulley quality and the warranty. Screens, color options and bundled extras come last, since they rarely change how the machine works.
What does a 2:1 pulley ratio mean in a cable machine buying guide?
A 2:1 ratio means the handle moves about twice as far as the weight stack and feels roughly half the stack weight. A 200 lb stack therefore delivers about 100 lb at the handle, minus a little friction. It gives a longer stroke and finer control at light loads, which is why home functional trainers often use it. A 1:1 machine delivers close to the full stack weight over a shorter stroke.
How much stack weight does a cable machine buying guide recommend for home use?
Most home lifters are well served by stacks in the roughly 100 to 200 lb range per side, but the right number depends on the ratio and your strongest pulling exercise. Check the handle load, not the stack number, and make sure the lightest increment suits isolation moves. If you plan heavy rows or pulldowns, favor a bigger stack or a 1:1 ratio, and verify the numbers with the manufacturer.
Is a functional trainer better than a single-stack tower in a cable machine buying guide?
A functional trainer is more versatile, since two adjustable arms allow crossovers, single-arm work and many angles. A single-stack tower is smaller, simpler and often cheaper, and it covers pulldowns, rows and pushdowns well. Choose the trainer if you have the room and want variety. Choose the tower if space is tight or your routine is mostly vertical pulls. Our functional trainer guide goes deeper on the first type.
How much space does a cable machine need, according to a cable machine buying guide?
Typical dual-stack trainers occupy roughly 4 by 3.5 feet and need a ceiling around 7.5 feet or more, but the real requirement is larger. Add two to three feet of clear space in front for standing pulls, extra room for a bench and a walkway so you can move freely. Single-stack towers and rack attachments need less. Always check the spec sheet and tape out the footprint on your floor first.
Does a cable machine buying guide say I should anchor the machine to the floor?
Follow the manual. Some tall or narrow machines are designed to be anchored or weighted at the base, because pulling forces and a loaded stack can create a tipping risk. Wide-base freestanding machines are often stable on their own. If you rent or can’t drill, ask about stabilizer feet or weighted base options and place the machine against a solid wall. Never assume stability from a listing photo.
How often should cables and pulleys be replaced?
There isn’t a universal schedule. Inspect them regularly, and replace a cable at the first sign of fraying, kinking or a damaged coating. Pulleys that grind, wobble or show flat spots should be replaced as well. Light home use may mean years between replacements, while heavy daily use wears parts faster. Check that the manufacturer sells spares, since that is a good sign of long-term support.
Is it worth buying a used cable machine?
It can be, if you inspect it carefully. Look at the cable ends, pulleys, guide rods and carriage, and run the stack through its full travel. Ask whether replacement parts are available and how old the machine is. Factor in the cost of moving and reassembling a heavy frame. A well-kept used unit from a reliable builder can beat a new budget machine, but a worn one is rarely a bargain.
Bottom Line: Using This Cable Machine Buying Guide
This cable machine buying guide boils down to a short checklist. Start with the pulley ratio, because it tells you what reaches your hand. Match the stack and increments to your lightest and heaviest exercises. Check the pulleys, cable and carriage, then measure your room twice, including the working zone and ceiling. After that, compare warranties and read the fine print on shipping and returns.
The right machine from any cable machine buying guide is the one that fits your space and gets used. For many people that’s a dual-stack trainer, for others a modest tower, and for plate owners it might be a rack attachment. Whichever you pick, you’ll be glad you did the math and the measuring first. If you want the bigger picture on what to own before and after a cable machine, start with the best home gym equipment for strength training, then keep this cable machine buying guide open while you plan your room using the home gym layout guide.
Sources and Further Reading
- HHS Physical Activity Guidelines — federal guidance on weekly aerobic and muscle-strengthening activity for adults
- CPSC exercise equipment recalls — check model safety history before you buy
Some links on this site may be affiliate links. If you buy through them we may earn a commission at no extra cost to you. Recommendations are based on the criteria in the article, not payout. This article is general information about equipment and isn’t medical advice; talk to a qualified professional about your own health and training. Last reviewed: October 2026.